6 Clever Ways to (Ethically) Boost Ecommerce Store Sales
With sites like Shopify making it easy for people to start up their own ecommerce store, you might have recently thought about starting up one of your own.
After all, if you want to make money online, setting up an ecommerce store can often be a great way to get started.
However, if you want to generate sales, setting up a store is not enough.
You need to know how to market your store so that sales actually occur.
In this post, we’re going to take a look at 6 things that you can do in order to generate sales for your ecommerce store.
We’ll look at specific tactics that you can put into action, while also analyzing why each tactic works.
Running an ecommerce store? Here are 6 clever ways to ethically boost your sales.
By the end of this post, you’ll be able to take your fledging store and turn it into a powerhouse that generates sales day and night.
Let’s go!
1. Paid Traffic
Paid traffic can be one of the best ways to quickly generate sales for your ecommerce store.
You might think that paid traffic is expensive and you’ve probably heard some stories of people who have spent a lot of money – and saw no return.
However, if done properly, paid traffic can, in fact, be quite affordable and once you have a winning campaign on your hands, paid traffic can really take your business to the next level.
More often than not, those who fail with paid traffic tend to make some common newbie mistakes.
So let’s quickly cover what you need to know ahead of time to protect yourself.
The first thing you must appreciate is the power of spending small amounts to ‘test the waters.’
Many of the people who are new to paid traffic think that they need to dump a lot of money into a campaign in order to see if paid traffic is for them.
Yet this is often the worst way of going about things.
A better approach is to just spend small amounts of money at a time. A good suggested starting point is no more than $50.
Even though Facebook Ad prices have risen by 247%, spending small amounts on the platform can still teach you a lot.
It’s important to spend small amounts, because there’s no guarantee that your campaigns are going to work out.
But that’s okay, because if one campaign doesn’t work, you can always create another one.
The nature of paid traffic, is that you’re often not going to get it right on your first go.
Sure, you can stick to best practices and improve your odds, but you’ll still need to do lots of experimentation to get optimal results.
You need to adopt the mindset of testing.
When running paid traffic campaigns, you should not spend your entire budget on a single ad variation.
Rather you should have multiple campaigns and then multiple ad variations for those campaigns.
You then drive traffic to each of them, closely monitoring the metrics to see which ads and which campaigns are bringing you desirable results.
The image below explains how you might want to go about things if you were running Facebook Ads.
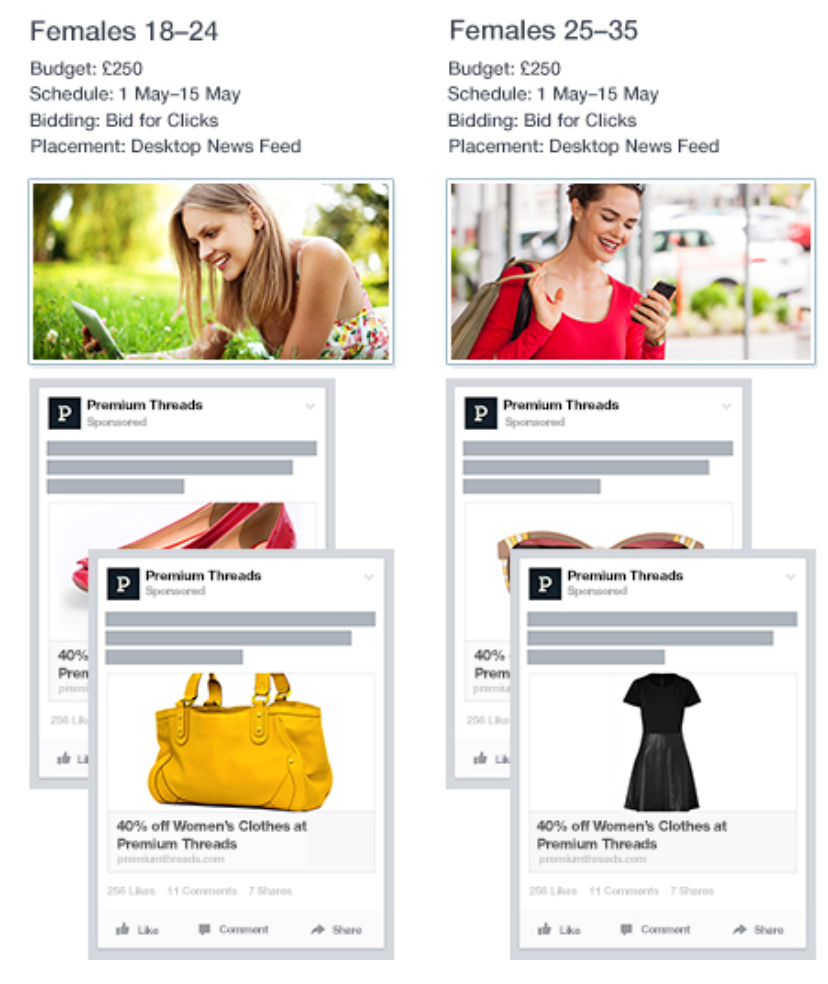
When you spot a few winners, you can then raise the spend for those ads and campaigns herunterladen.
You must also have a clear understanding of who your customer is.
Knowing who your target customer is will also allow for you to make the most out of the advanced targeting options provided by the platforms we’re going to take a look at.
Good targeting ensures that your ads are shown to the right people.
If your ads are shown to the right people, there’s an increased chance of sales occurring on your ecommerce site.
If you’re struggling to figure out who your customer actually is, generating a Buyer Persona can help you along.
Alternatively, if you have an email list of customers, consider sending them all a survey to better define who they are.
Provide an incentive, such as a coupon code, to ensure that people fill out surveys quickly and honestly.
So now that we’ve got that out of the way, let’s look at the ad platforms that you can use in order to generate sales.
And those are….
Each platform is going to work slightly differently, so let’s briefly go through each one and see how you can use it to generate sales.
There’s not much information out there about Twitter, so let’s just go through the process of creating an ad on Twitter.
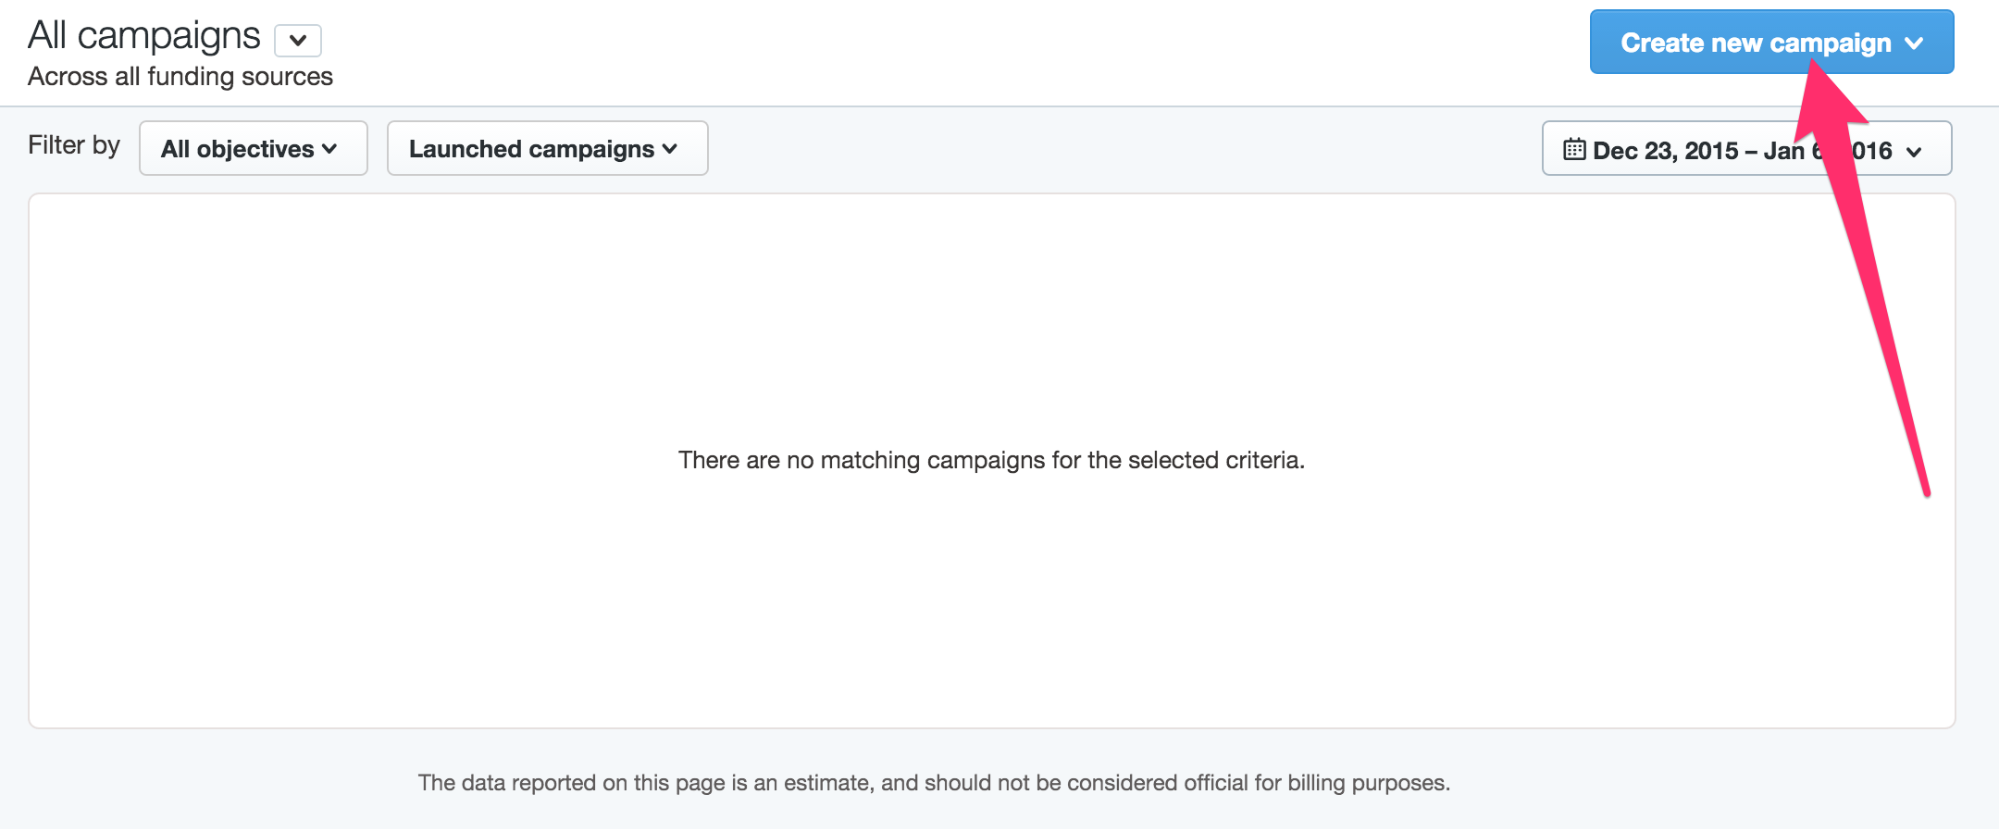
First head over to business.twitter.com.

Then click on ‘Twitter Ads.’
You should then see the following page.
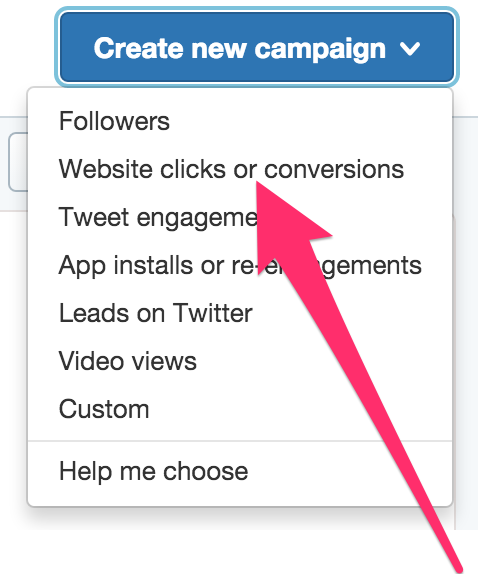
When there, click on ‘Create new campaign.’
When you click on that button, you’ll see a drop down menu.
Pick the option called ‘Website clicks or conversions.’
You’ll then be taken through the ‘set up’ process for your ads.
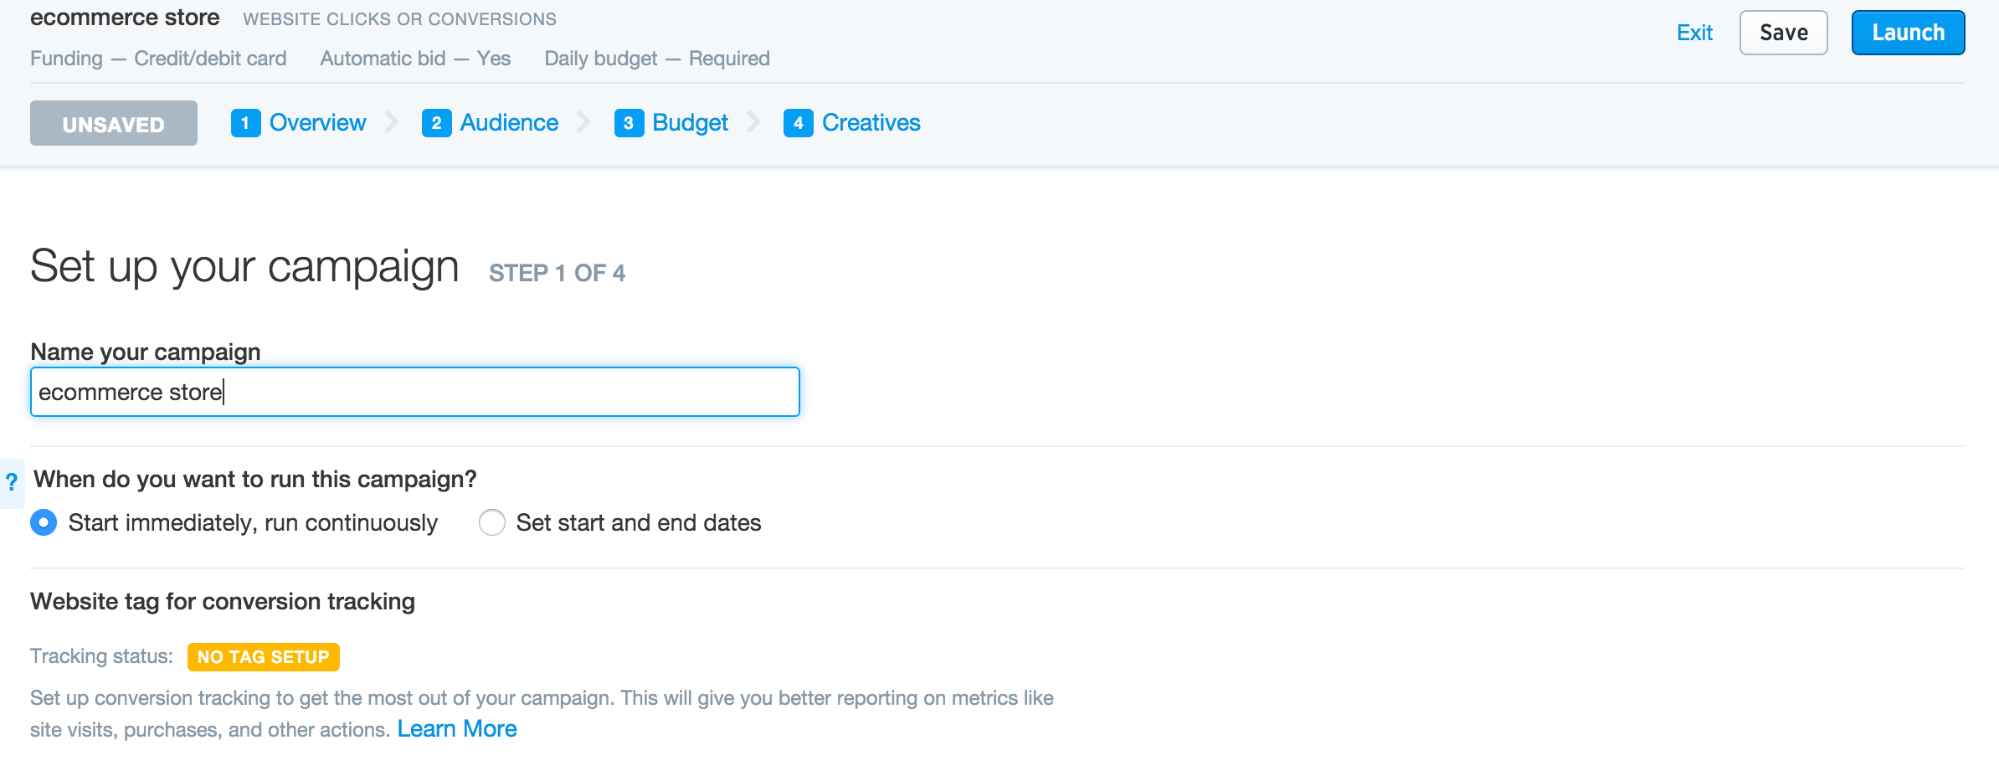
Give your campaign a name.
If you have the time and ability to do so, set up ‘conversion tracking.’
In doing so, you’ll be able to gather some valuable data, in terms of how your campaign is performing, and if it is delivering on the goals you’re aiming for.
You’ll then need to ‘Select your audience.’
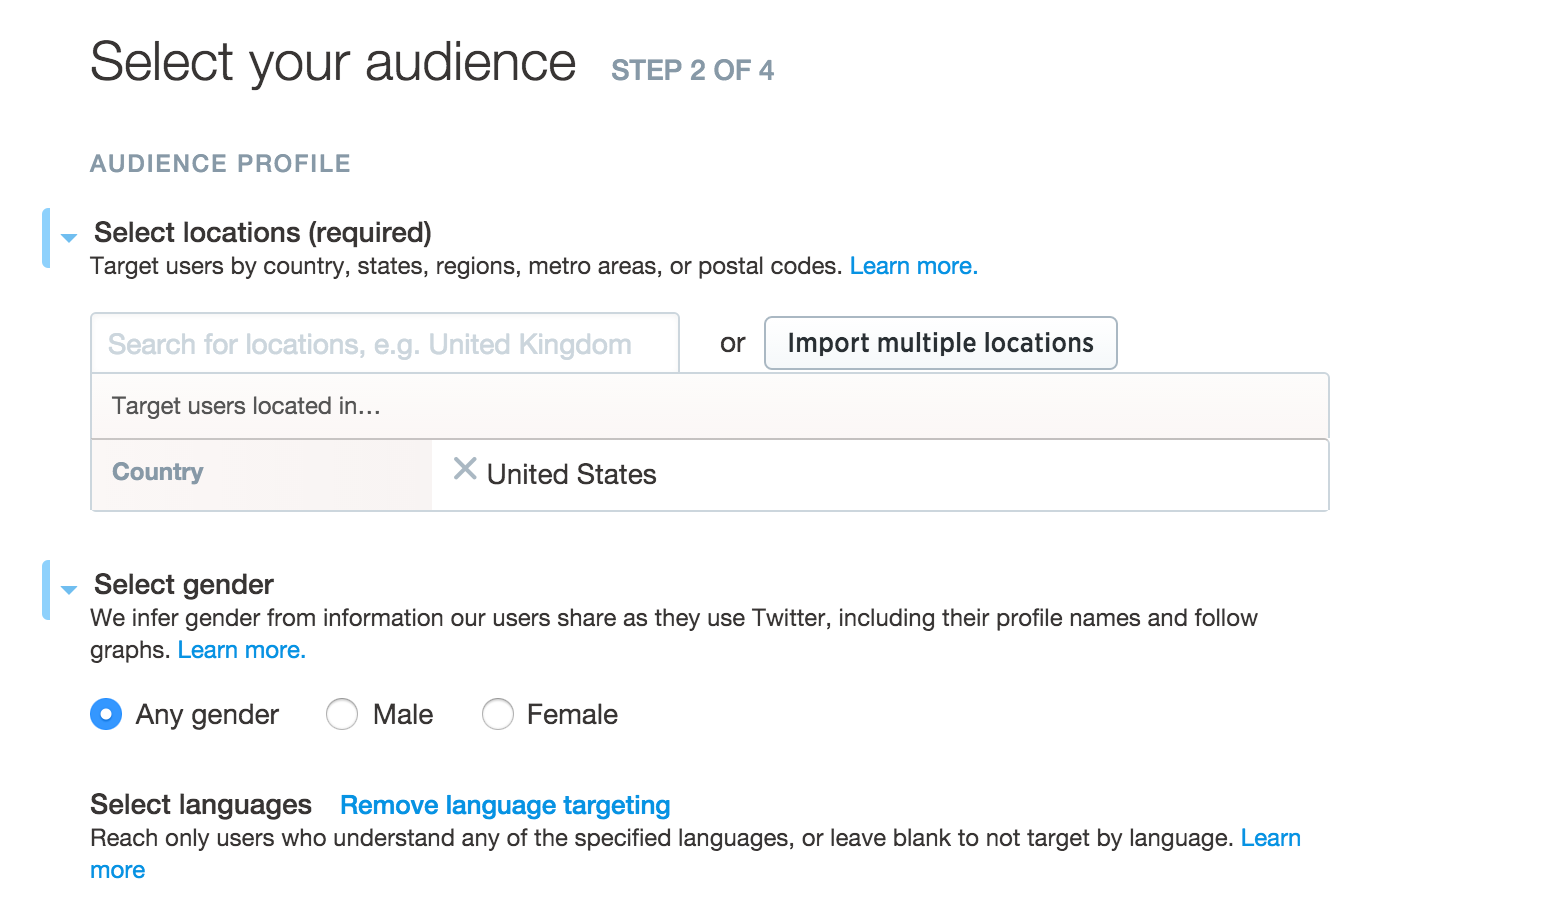
Pick a location that best represents your target customers.
If you have the means to do so, consider picking a few of the top English speaking countries, such as the UK, Australia and New Zealand.
To ensure that your ads are shown to people who will understand them, pick the language as ‘English.’
The gender option is going to depend on the kind of products you’re going to be promoting.
You then need to ‘Select devices and platforms.’

If you’re going to pick any mobile devices, ensure that your website is set up to work properly on mobile devices.
The ability to ‘Target new devices’ doesn’t really matter for the moment.
Then there’s the option to ‘Select Additional Audience Features.’
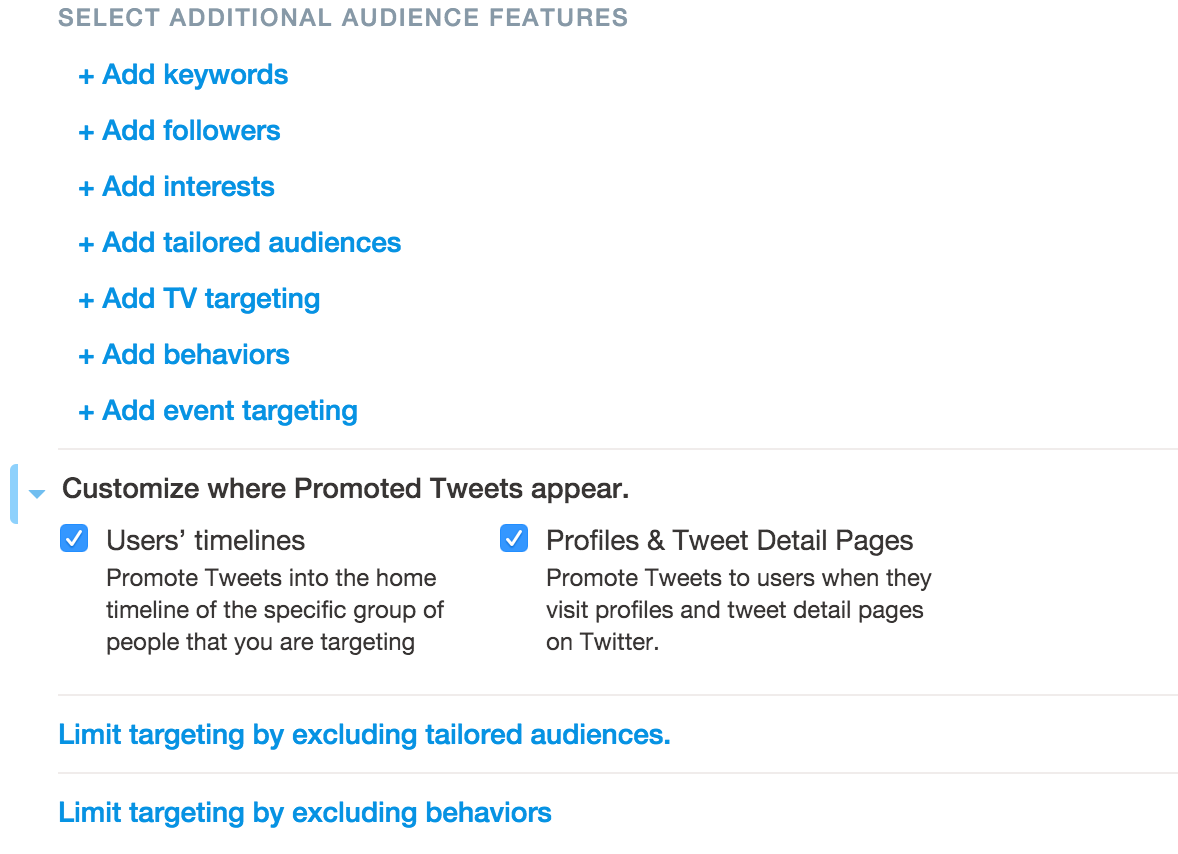
This is where you can really adjust the targeting options of your ads.
As you can see, there are several options here when deciding on the targeting.
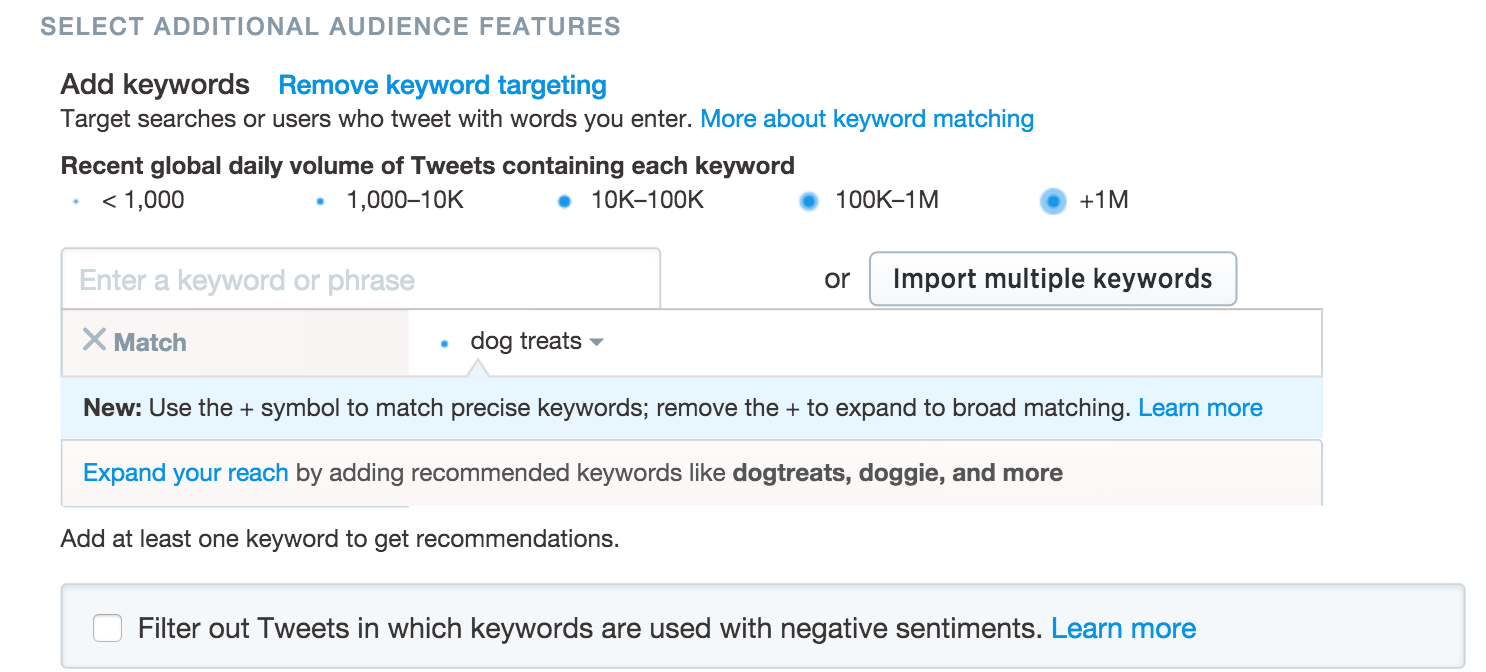
‘Keywords,’ lets you target Twitter users who use the keyword you select gratis musik herunterladen youtube.
When setting up the ‘Keywords,’ you have the option of deciding what you want Twitter to do with the keywords provided.
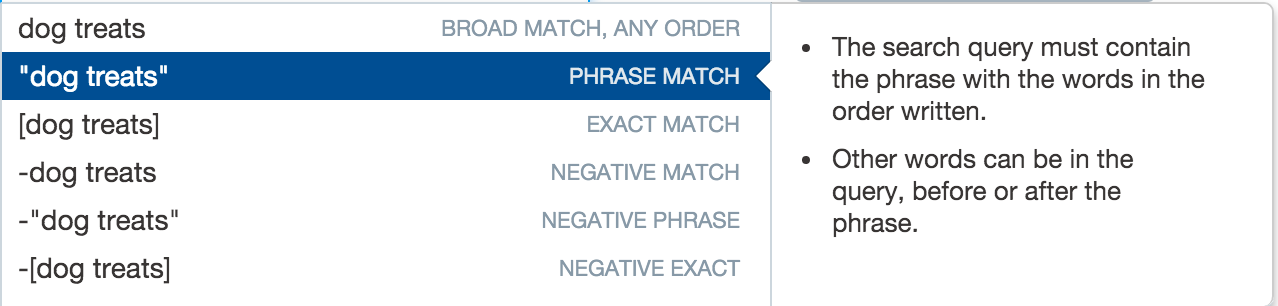
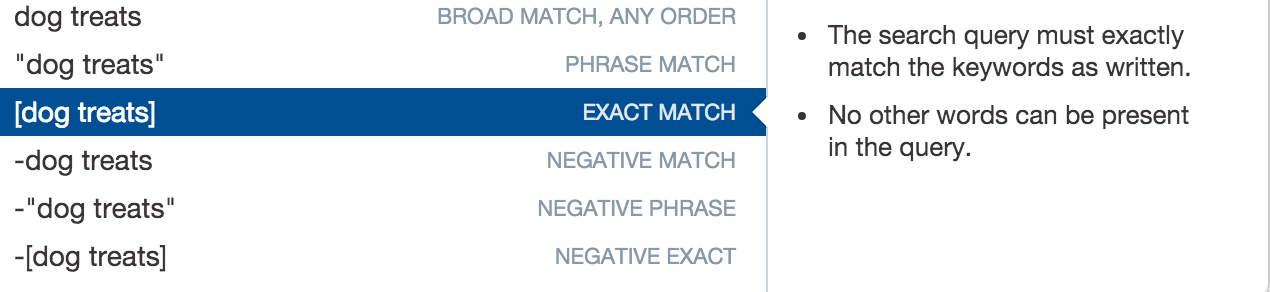
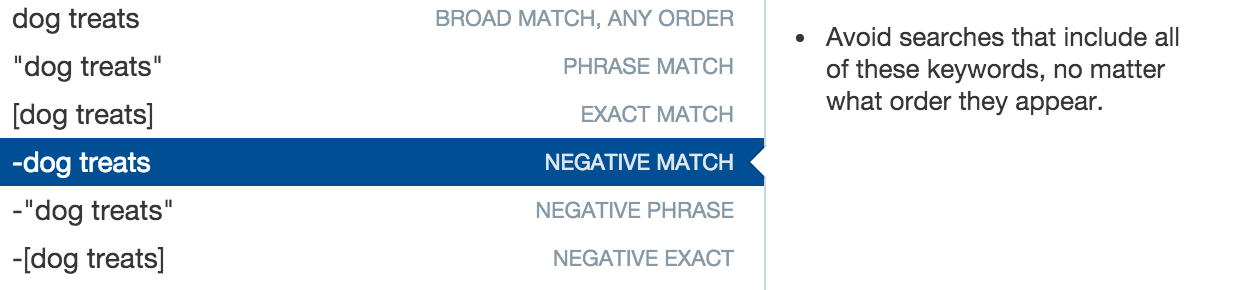
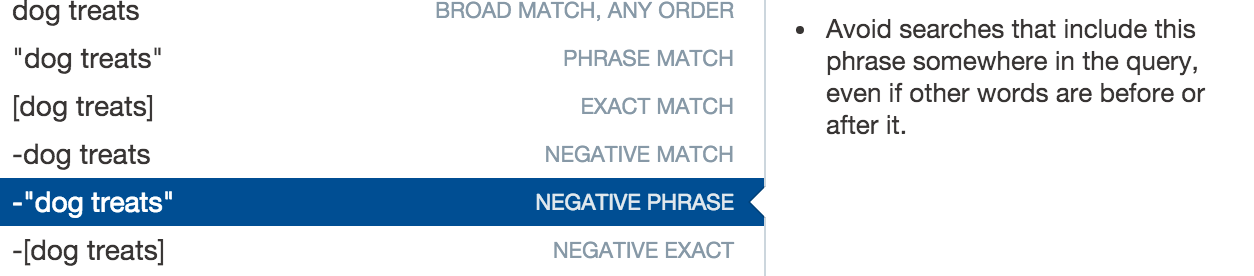
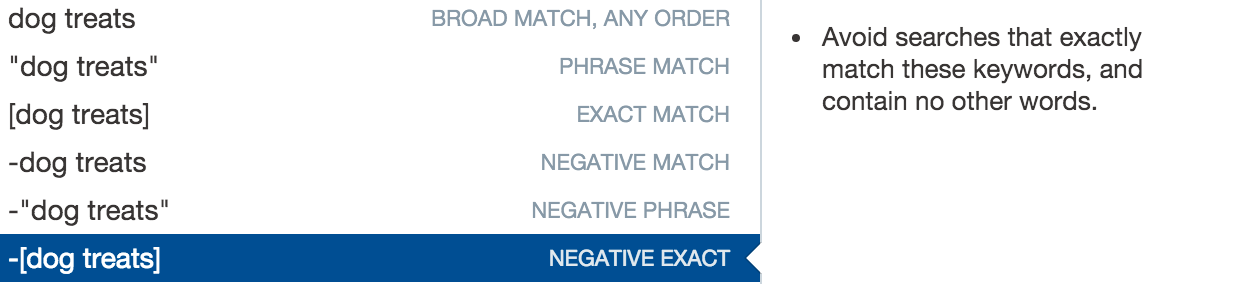
Let’s imagine I want to sell ‘dog treats.’
I can choose the keyword ‘dog treats,’ but I can decide that I want all variations and even similar versions of the keyword, to be targeted.
This can be a good idea if you’re trying to reach a lot of people.
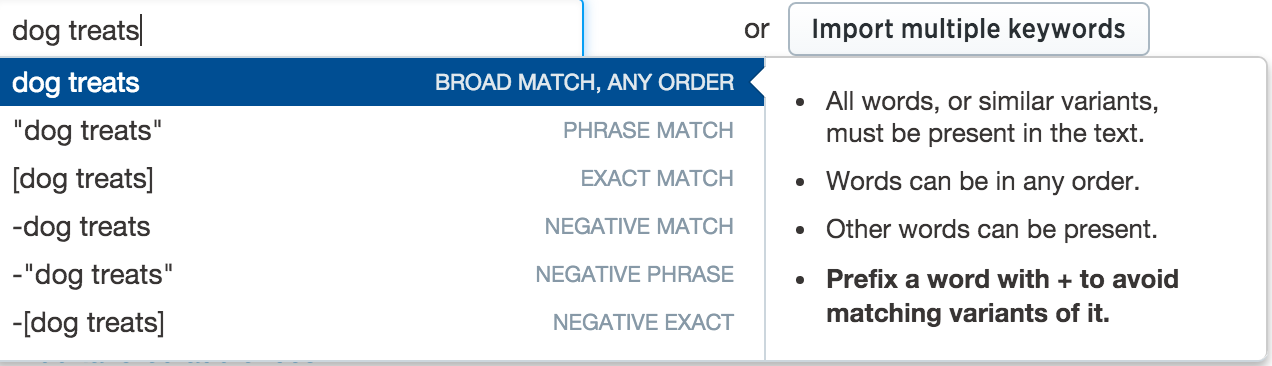
There’s also the option of ‘Phrase Match,’ of which allows for you to target phrases that contain the keyword you have chosen.
You can also pick the ‘Exact Match,’ option, that ensures only that keyword in isolation is targeted.
And then you can do the same in reverse, by picking the ‘Negative match,’ keywords.
This is where you exclude the keywords you choose.
Here’s what would happen if you chose ‘Negative Phrase.’
And here’s what what would happen if you chose ‘Negative Exact.’
When you do select a keyword, Twitter will then let you know the estimated ‘daily volume,’ based on the ‘Tweets containing each keyword.
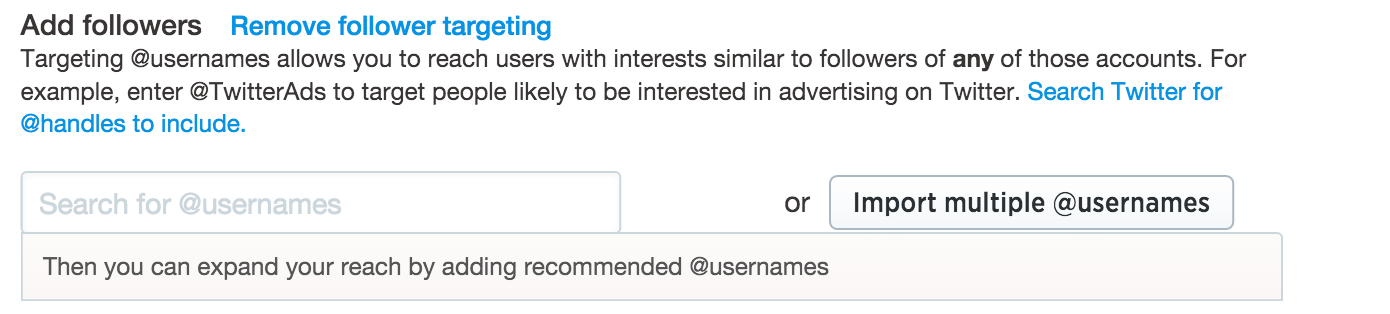
‘Followers,’ gives you the chance to target other Twitter users who have similar interests in relation to the keyword you select.
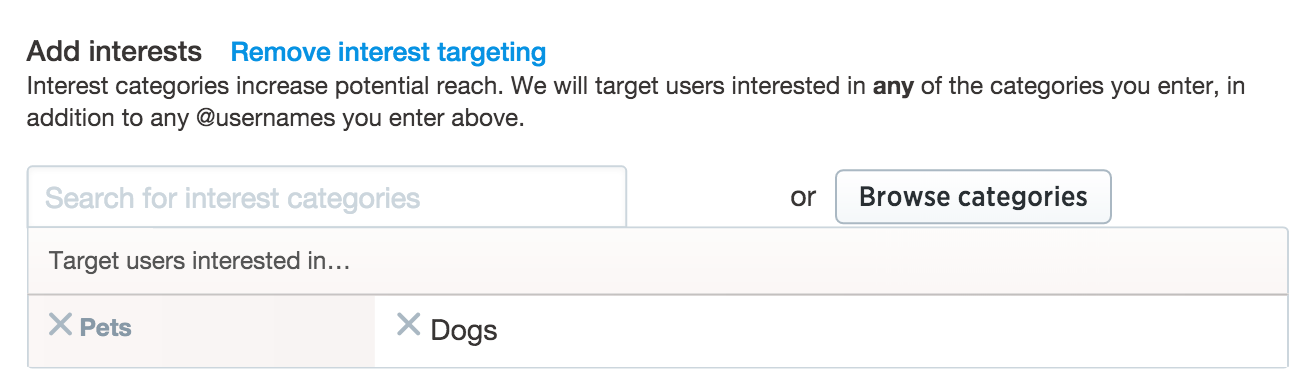
‘Interests,’ as the name suggests, lets you target by interest.
‘Tailored Audiences,’ let’s you target your existing list of customers, or those who have already visited your site.

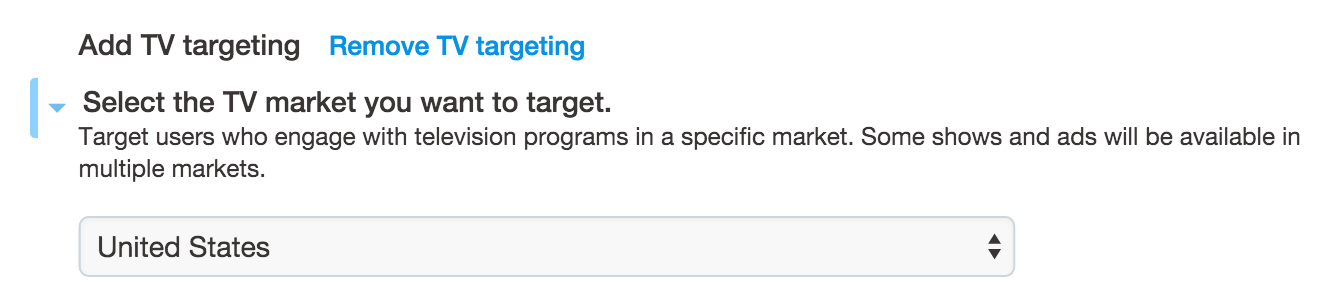
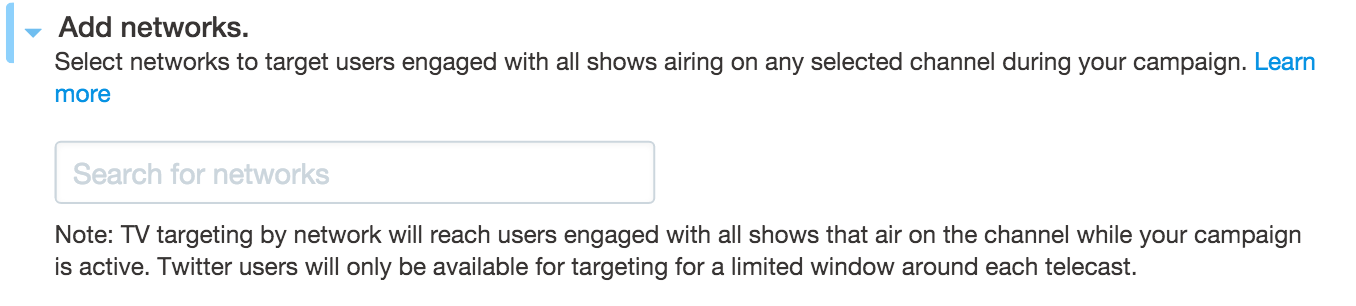
‘TV targeting,’ provides you with the chance to target by TV Markets.
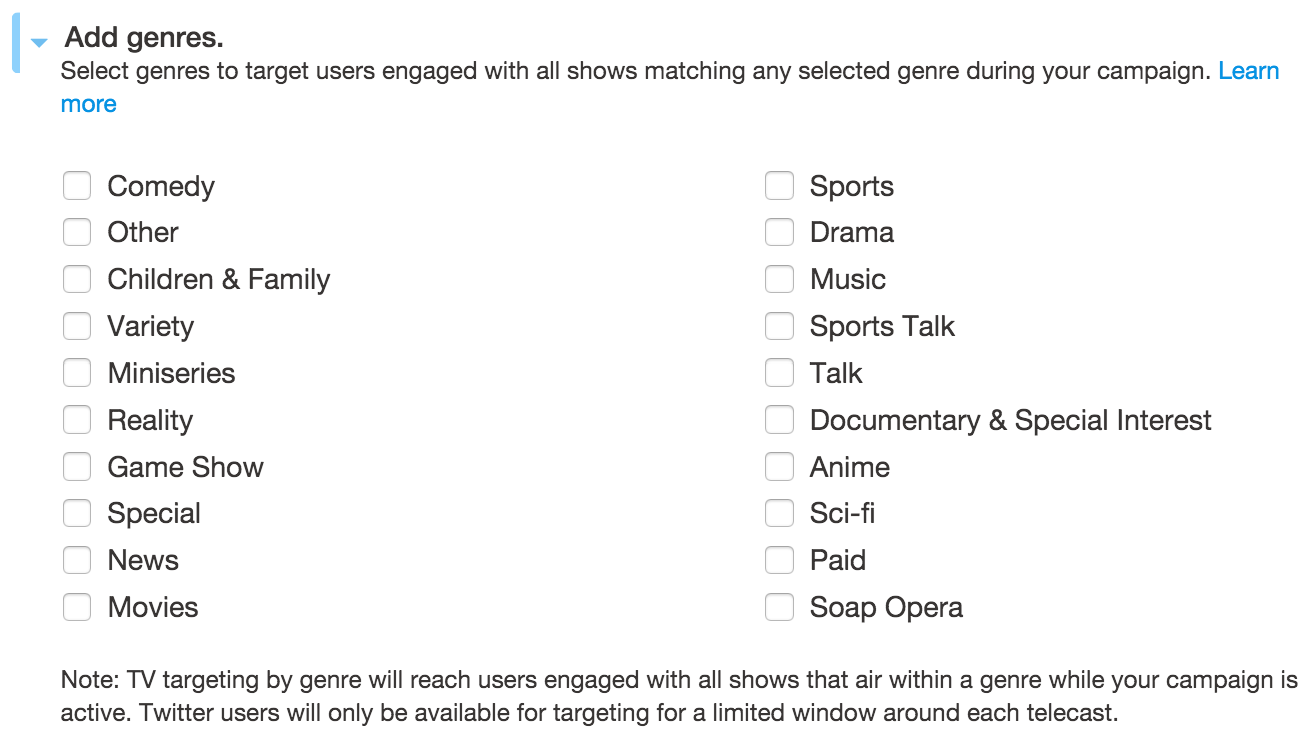
You can even target networks and show genres.
Here’s how you can pick genres.
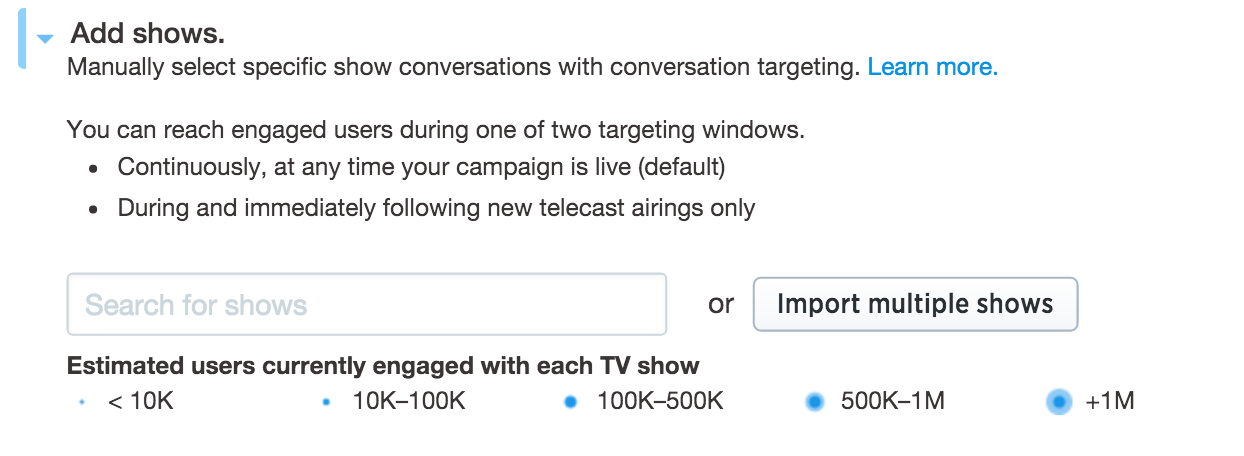
You can also target specific ‘shows,’ too. If I was promoting ‘dog treats’ I might target TV shows that are related to dogs.
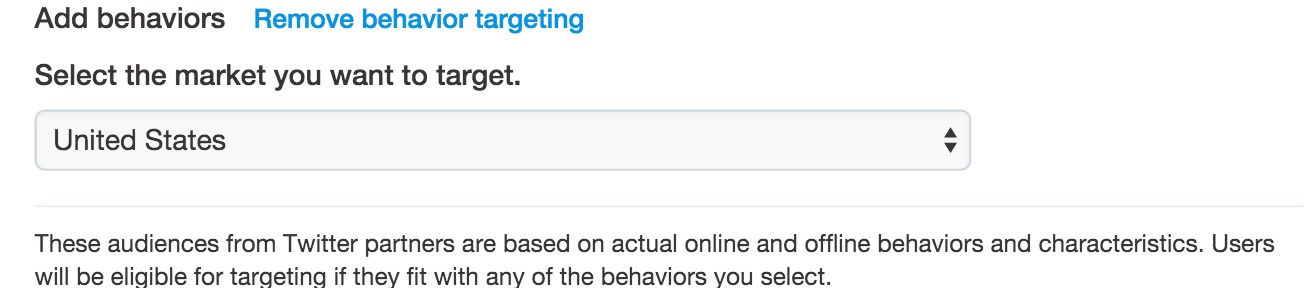
‘Behaviors,’ let’s you target people by their recent behaviors, based on 3rd party data.
‘Event targeting,’ is when you target your ads based on certain regional or even global events.
If I were promoting ‘dog Treats,’ I may use this feature whenever there is a big convention related to dogs taking place somewhere in the world.

As mentioned before, if you want to make the most out of these features, you need to have a good sense of who your target audience is.
The better you know your audience, the more you’ll be able to come up with unique angles for how to reach your target audience.
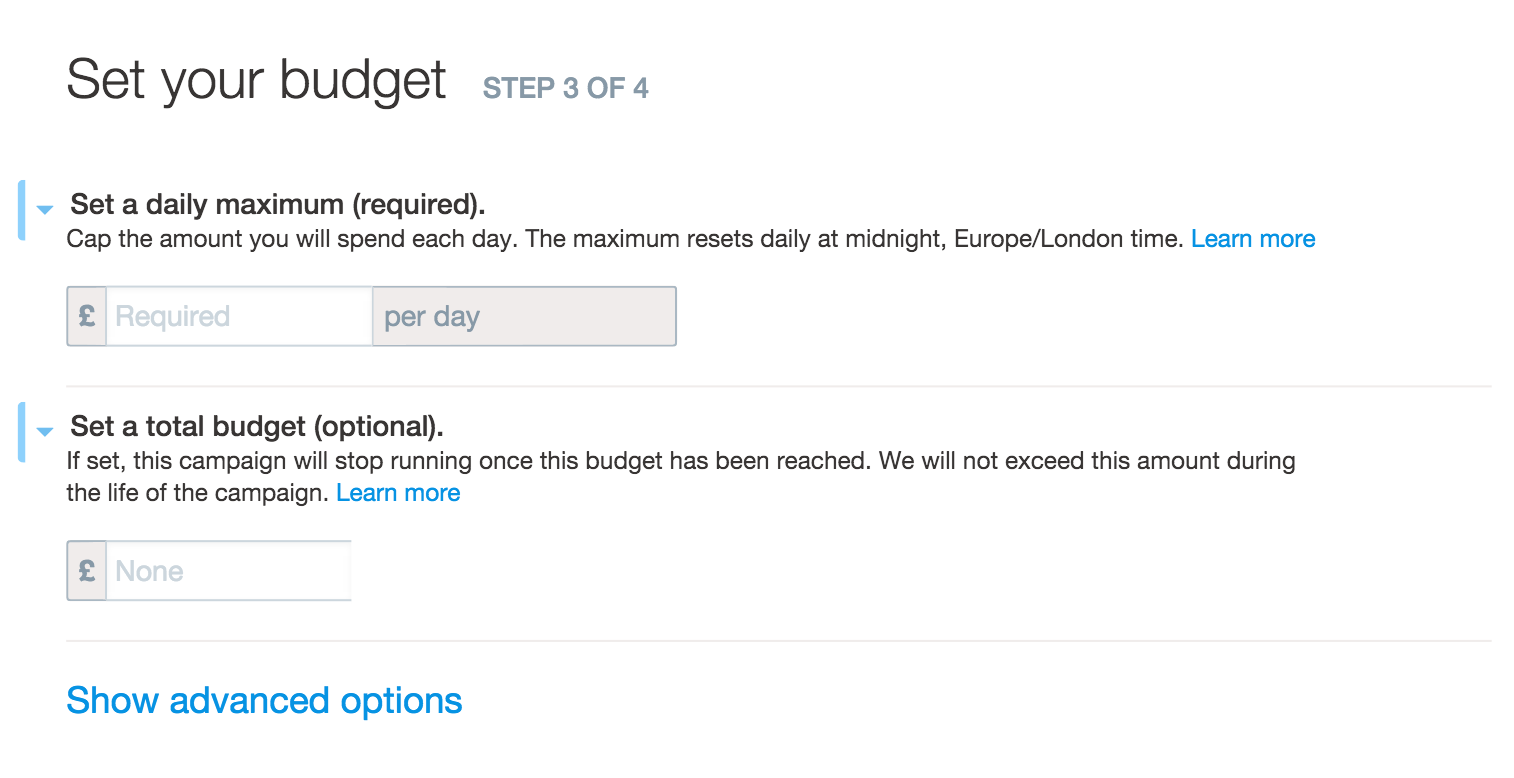
The next step is deciding on a budget.
When you pick daily maximum budget, you’ll see on the right hand side the ‘Estimated Reach.’
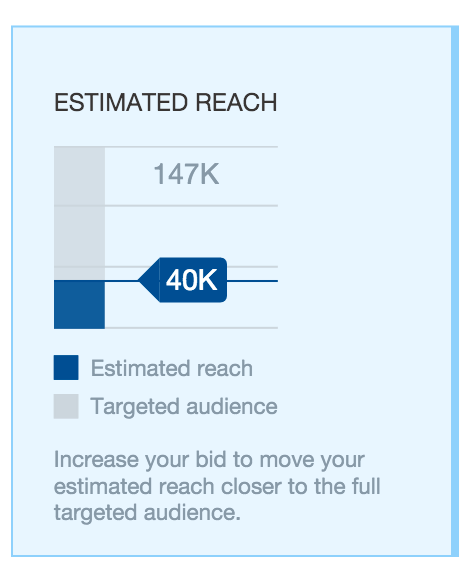
Here you can see that with the current budget, the estimate reach is ‘40K,’ but the target audience is actually ‘147K.’
This is important, because it let’s you know the potential of the market ps3 spiele downloaden kostenlos.
If you have a successful ad on your hands, you know that you can increase your ad spend and still ensure that it is going to be shown to a relevant audience that will convert.
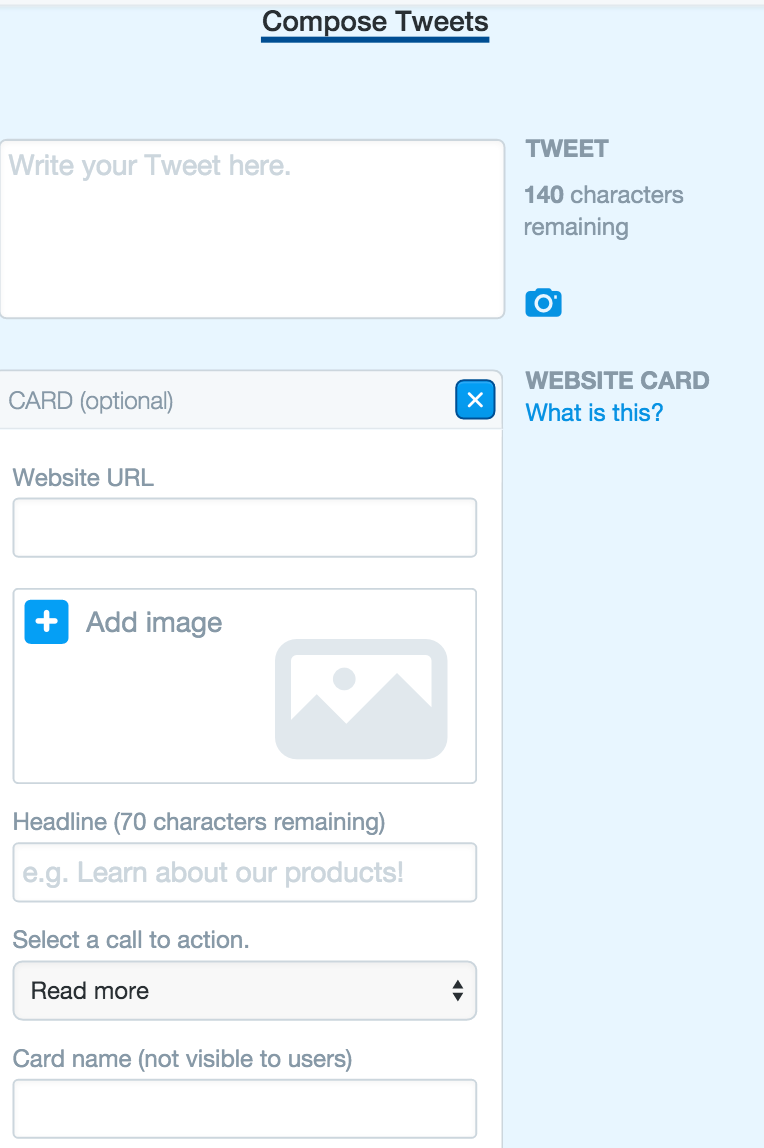
You then need to ‘Compose Tweets.’
There’s a lot to be said about creating effective Tweets on Twitter.
However, you’ll often find that you can learn a lot by just looking at some of the other successful Tweets out there.
A good place to begin is to look at the Success Stories page, within the ‘Business,’ section of Twitter.
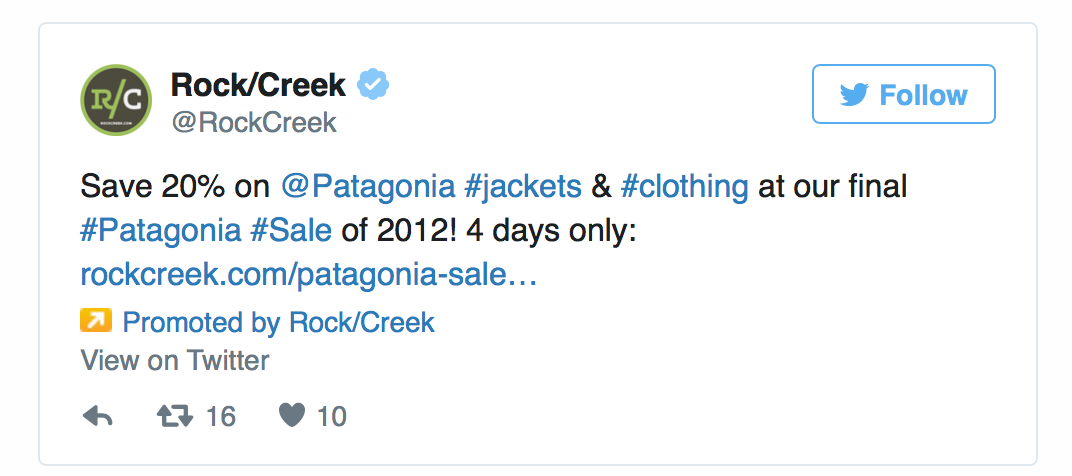
A lot of the time, you’ll find that people respond well to discounts and coupons on Twitter.
Therefore, when running a promotion on the platform, you might want to showcase that you have a particular offer running at the moment.
Here’s an example from a company called Rock/Creek. They managed to see a 20% increase in sales, thanks to their promotion efforts.
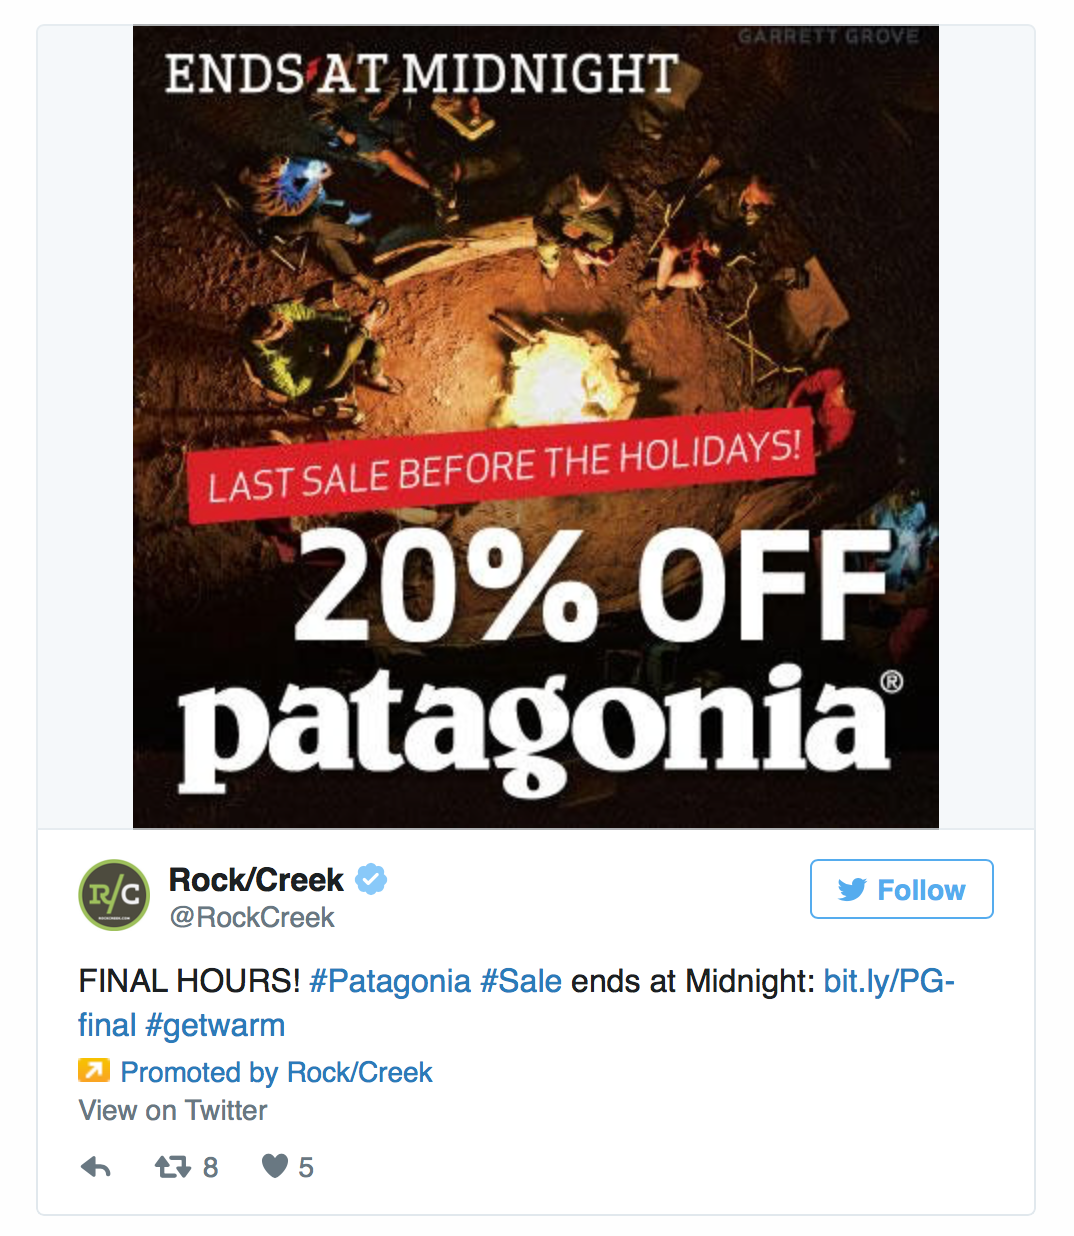
On top of that, whenever you are promoting a tweet, make an effort to include a ‘call to action’ within each one, or at least something that creates a sense of urgency.
Here’s another tweet from the same company, that does a great job at just that.
If you have an existing Tweet that is already bringing you a great level of engagement, then consider promoting that too.
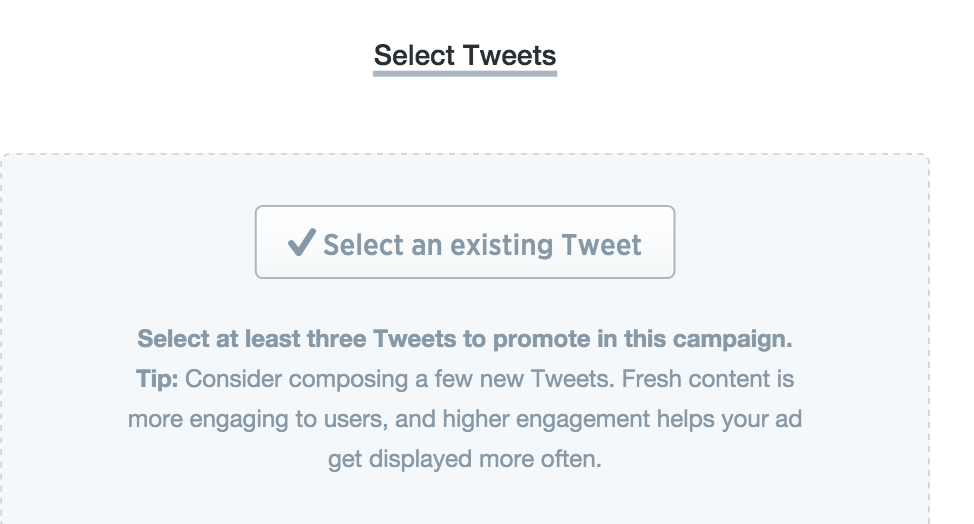
Keep in mind, however, that if the Tweet doesn’t include a call to action, it may just help raise awareness for your brand more than anything.
If you want to maximize the impact of your Promoted Tweets, you might want to consider the use of a ‘Website card.’
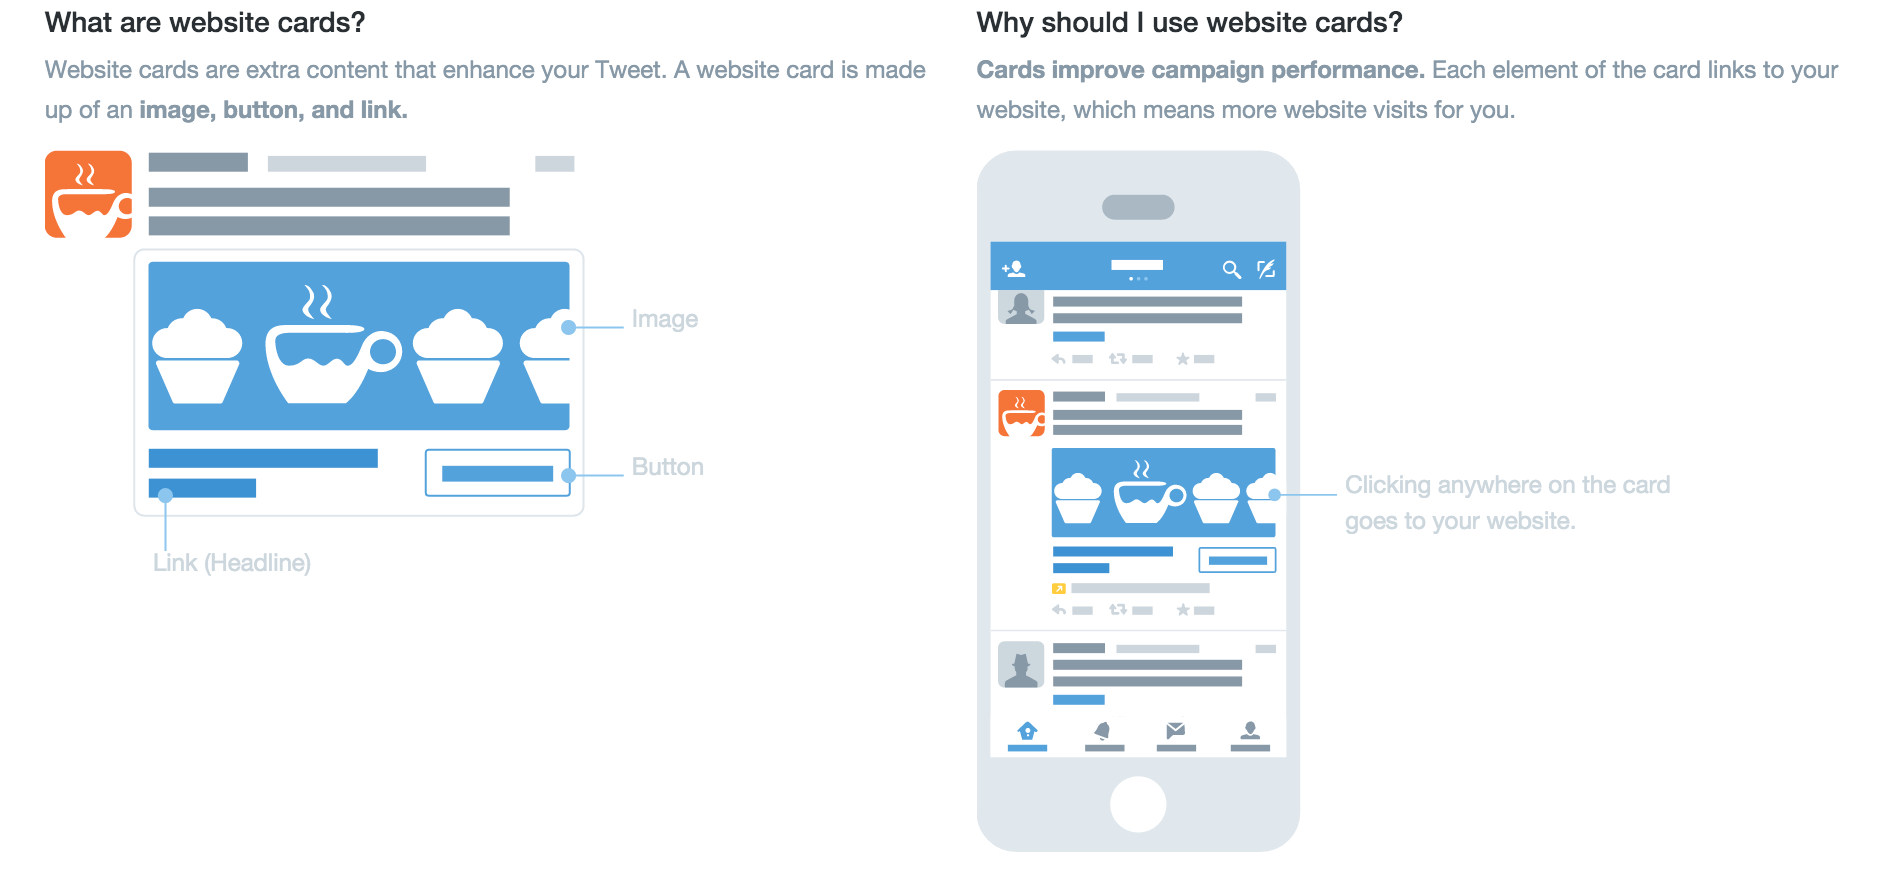
Such a card will allow for you to include a large clickable image within your ad.
There is also the option to include a button that provides the viewer with a call to action.
Okay, so that’s how you can use Twitter Ads to generate sales for your ecommerce store.
Now let’s quickly cover how you can use Facebook and Instagram.
Even though they’re both different platforms, Facebook owns Instagram, so you’ll create Instagram ads within the Facebook Ad Manager.
I’ve already covered in detail how you can create Facebook Ads, so let’s just take a look at some unique strategies you can use within Facebook Ads to generate sales.
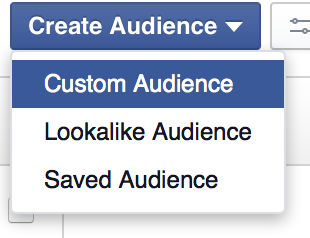
The first is ‘Lookalike Audiences.’
This is where Facebook will show your ads, based on audiences that are similar to the ones you’re already targeting or serving.
Facebook can do this because you create something known as a ‘Custom Audience.’
Facebook will then analyze that Custom Audience and target other people on Facebook who share similar traits.
This reduces the amount of time you have to spend adjusting targeting settings, while also allowing for your ads to be shown to the right kinds of people.
To create this audience, Facebook will need to analyze your website visitors or even just a list of customers you have in your possession.
If you want to set up Lookalike audiences, head over to https://www.facebook.com/ads/manager/audiences/.
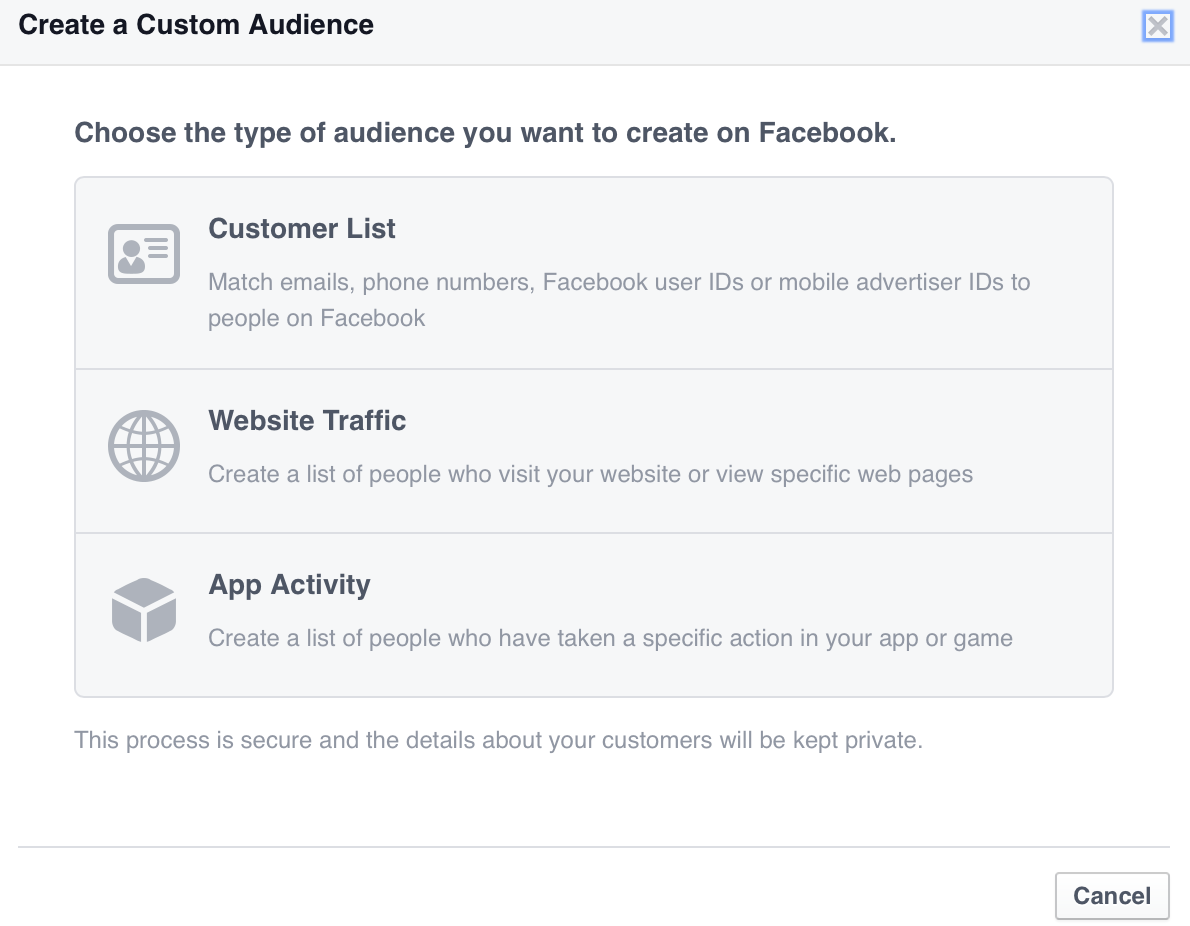
When there, you first need to create a ‘Custom Audience.’
To do that pick the ‘Custom Audience’ option, from the drop down menu.
You then need to pick a ‘Source Audience,’ that Facebook can analyze free sims 4 voor mac.
 If you want to use ‘Website Traffic,’ as your ‘Source Audience,’ you’ll need to install a ‘Facebook Pixel’ on your site.
As you get better at using Facebook Ads, you can use the Facebook Pixel to create ad campaigns geared towards really niche audiences.
For now, however, if you just want to use people on your email list, pick the ‘Customer List,’ option and follow the instructions.
Once you’ve uploaded your Custom Audience to Facebook and it has been analyzed, you then need to select ‘Lookalike Audience’ from the drop down menu.
You should then see the following.
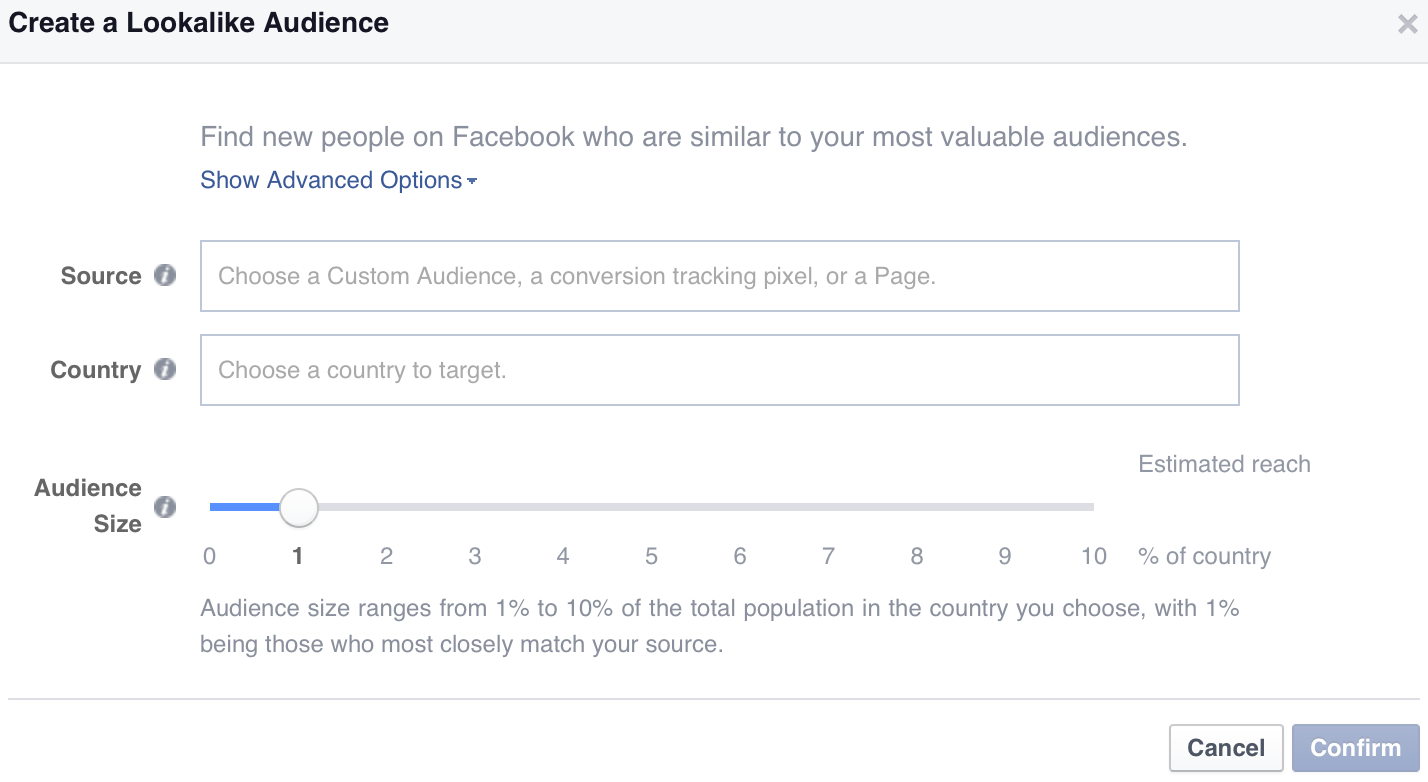
Then pick the audience you set up earlier and choose the country.
Keep the audience size near 1% for now, as this will ensure that the targeting is fairly tight.
Another strategy you can use is retargeting.
Retargeting (also known as ‘remarketing’) is when your ads are shown to people who have already visited your site.
This can be a great way to show ads to people who have taken a look at a certain product page, but have not taken action.
To set up retargeting, you’ll need to follow the instructions mentioned above, in terms of how to create a Custom Audience.
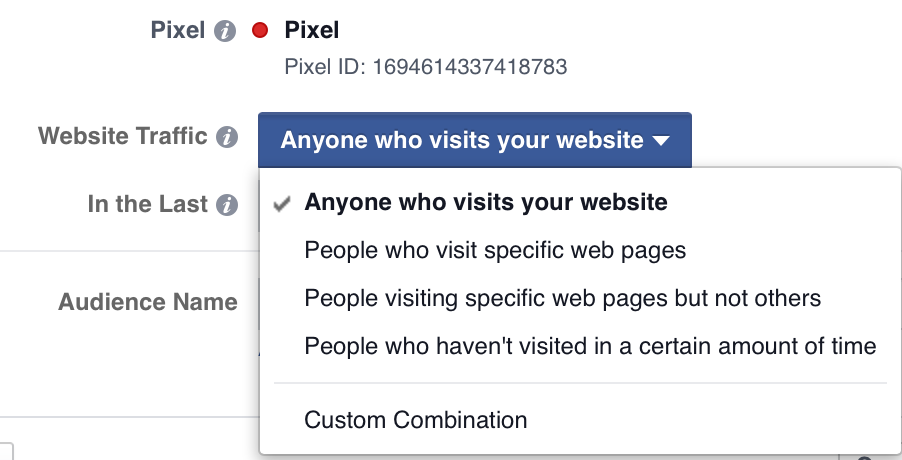
However, when adjusting the settings for the Facebook Pixel, you’ll want to pick something that is representative of what you’re trying to achieve.
Say you have a website that sells ‘dog treats,’ and you want to retarget those who have looked at the product page that sells ‘Chicken Dog Treats.’
You would first adjust your Facebook Pixel so that it collects data based on ‘Website Traffic,’ and, more specifically, ‘People who visit specific web pages.’
You would then enter in the URL of your product page where ‘Chicken Dog Treats’ are being sold.
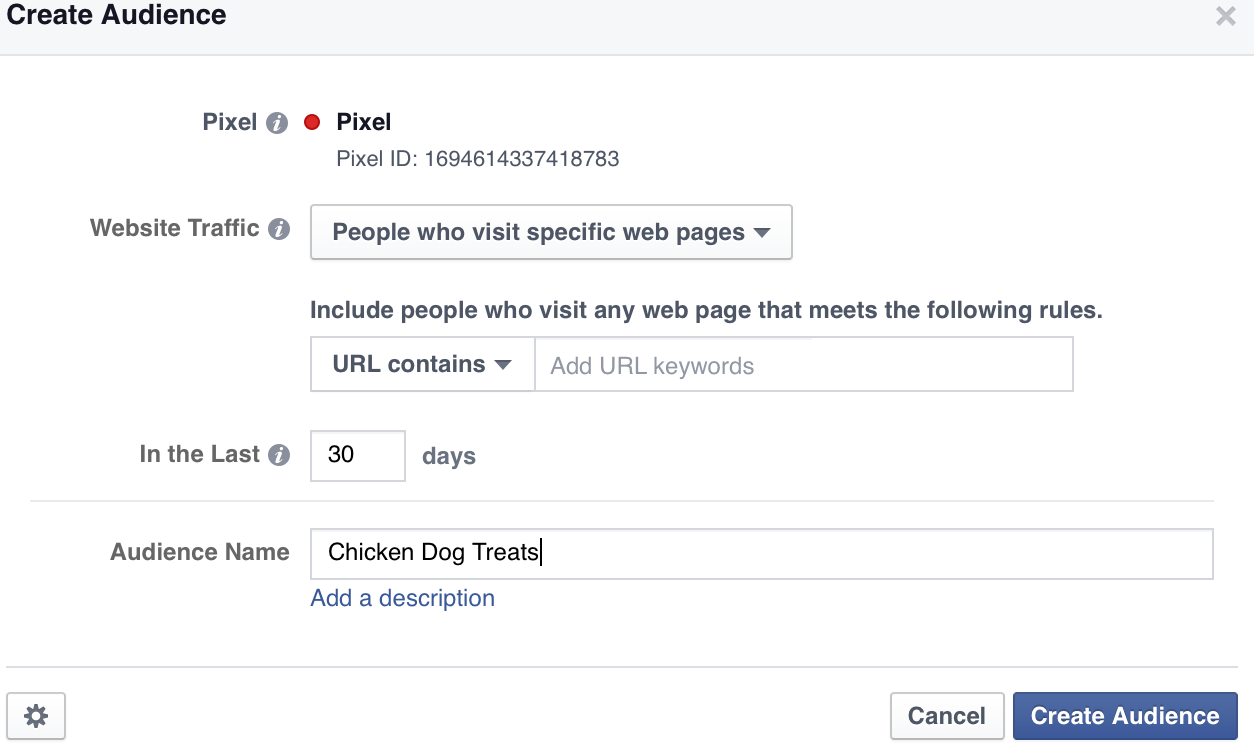
Then you’d click ‘Create Audience.’
Once you’re sure that your pixel has been installed, you can create an ad that targets this group of people specifically (people who looked at Chicken Dog Treats on your site but did not buy).
To do that, go through the ad creation process, but when it comes to setting up your targeting, pick the audience you created in the ‘Custom Audience,’ section.

The creation process for Instagram ads is pretty much the same as it is for Facebook Ads.
However, the creatives (the images) tend to work differently across the platforms.
There’s no need to worry, however, as I have covered how you can create great images for your Instagram accounts, in this past post.
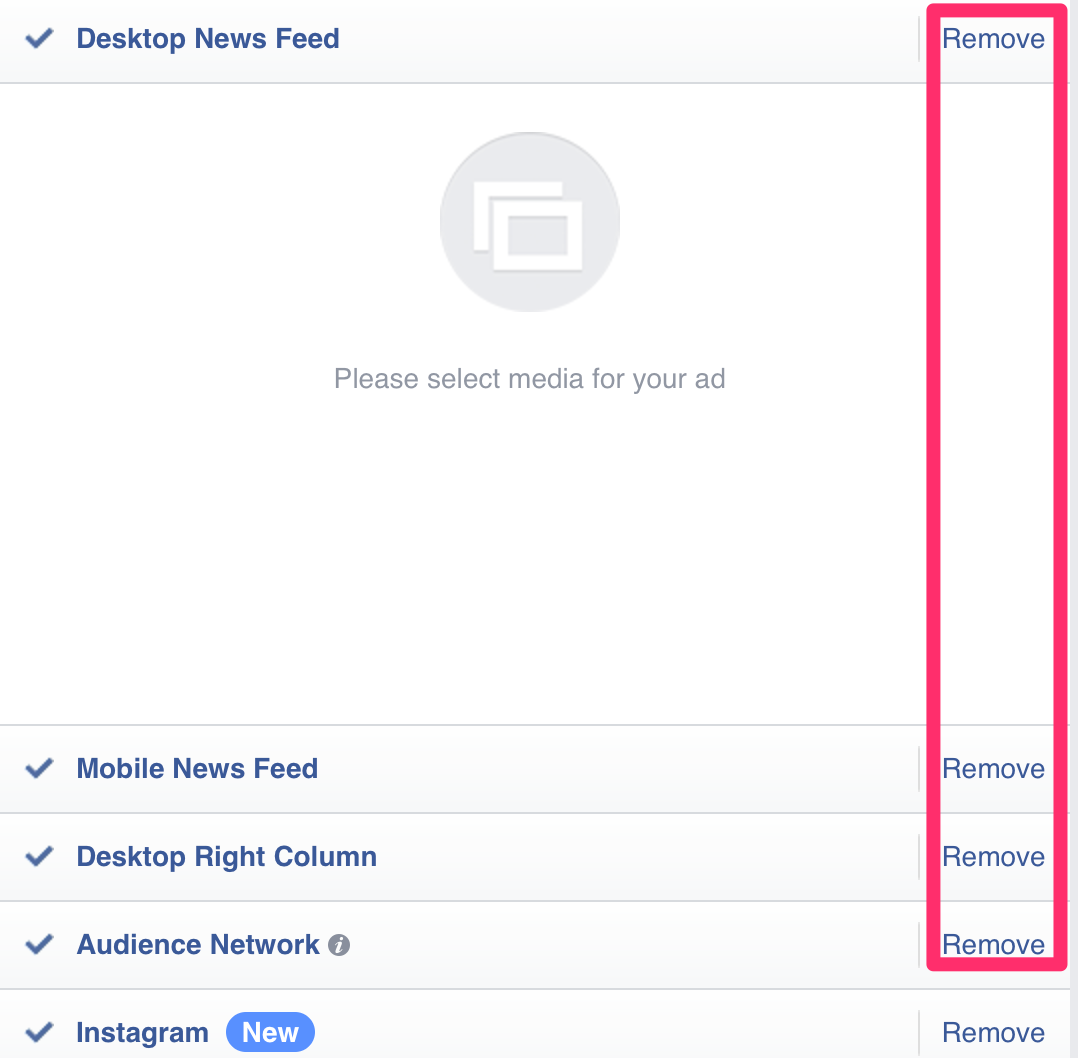
Just make sure that if you’re going to create ads directed towards Instagram only (or even just for Facebook), you remove all the options that aren’t relevant.
So that’s how you can use paid traffic in order to boost the number of sales you’re generating for your ecommerce site.
Now let’s look at what else can be done.
2. Improve trust within your funnel
Another method you can use to boost sales within your ecommerce site, is to boost trust within your funnel.
That might sound complicated, but let’s just break it down to see what it really means.
When someone is going to buy something from your site, their journey is most likely going to look like this:
See an Ad/Visit Site Using URL – > View Product Page -> View Checkout -> Go through Checkout Process microsoft store appsen.
In rough terms, the process outlined above could be referred to as the funnel that potential buyers go through before an actual transaction is made.
By increasing the amount of trust that people have at each stage of the funnel, you’ll be able to improve conversions.
For the product page, there are a couple of things you can do in order to boost trust.
One is to include reviews of the products that are being displayed.
By displaying reviews, you will be able to provide some ‘Social Proof,’ in terms of how good the product actually is.
In fact, 77% of people consult online reviews, before purchasing something – so it’s worth displaying any if you can.
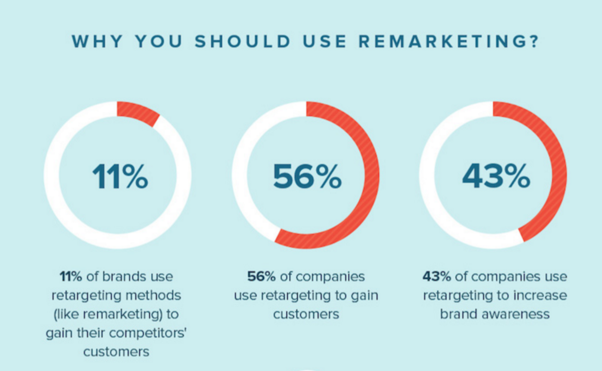
Another step you can take is to install a ‘live chat’ option on your site.
Research has shown that consumers prefer live chat over all other forms of customer service.
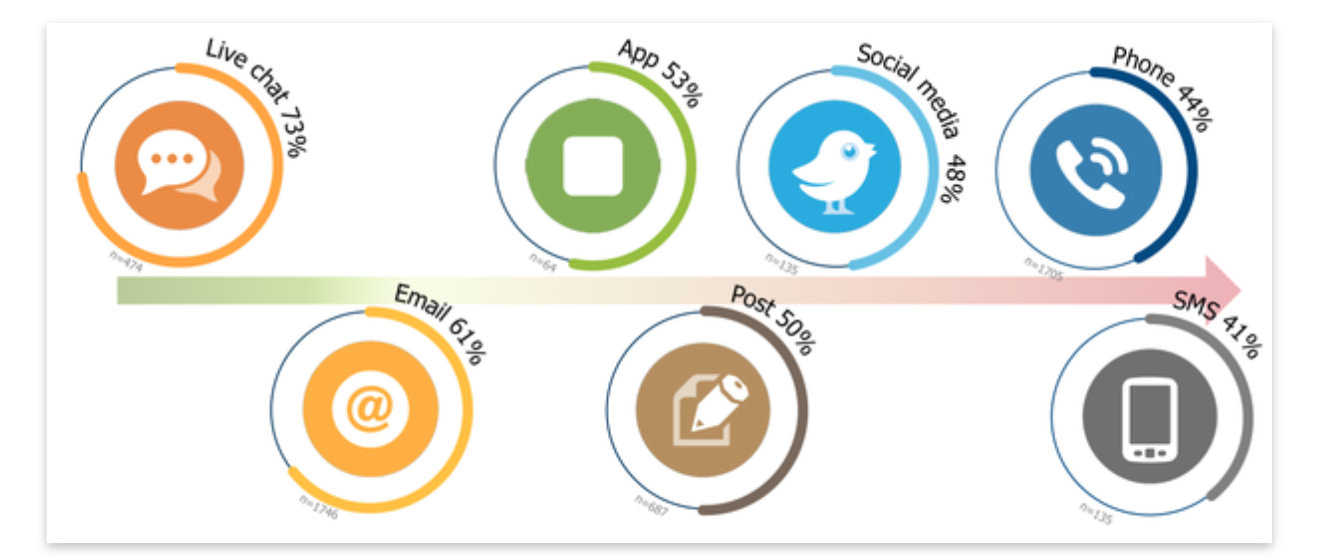
As you can see, ‘live chat’ is in the lead with 73%.
79% of the people who like live chat, prefer it because it allows for their questions to be answered quickly.

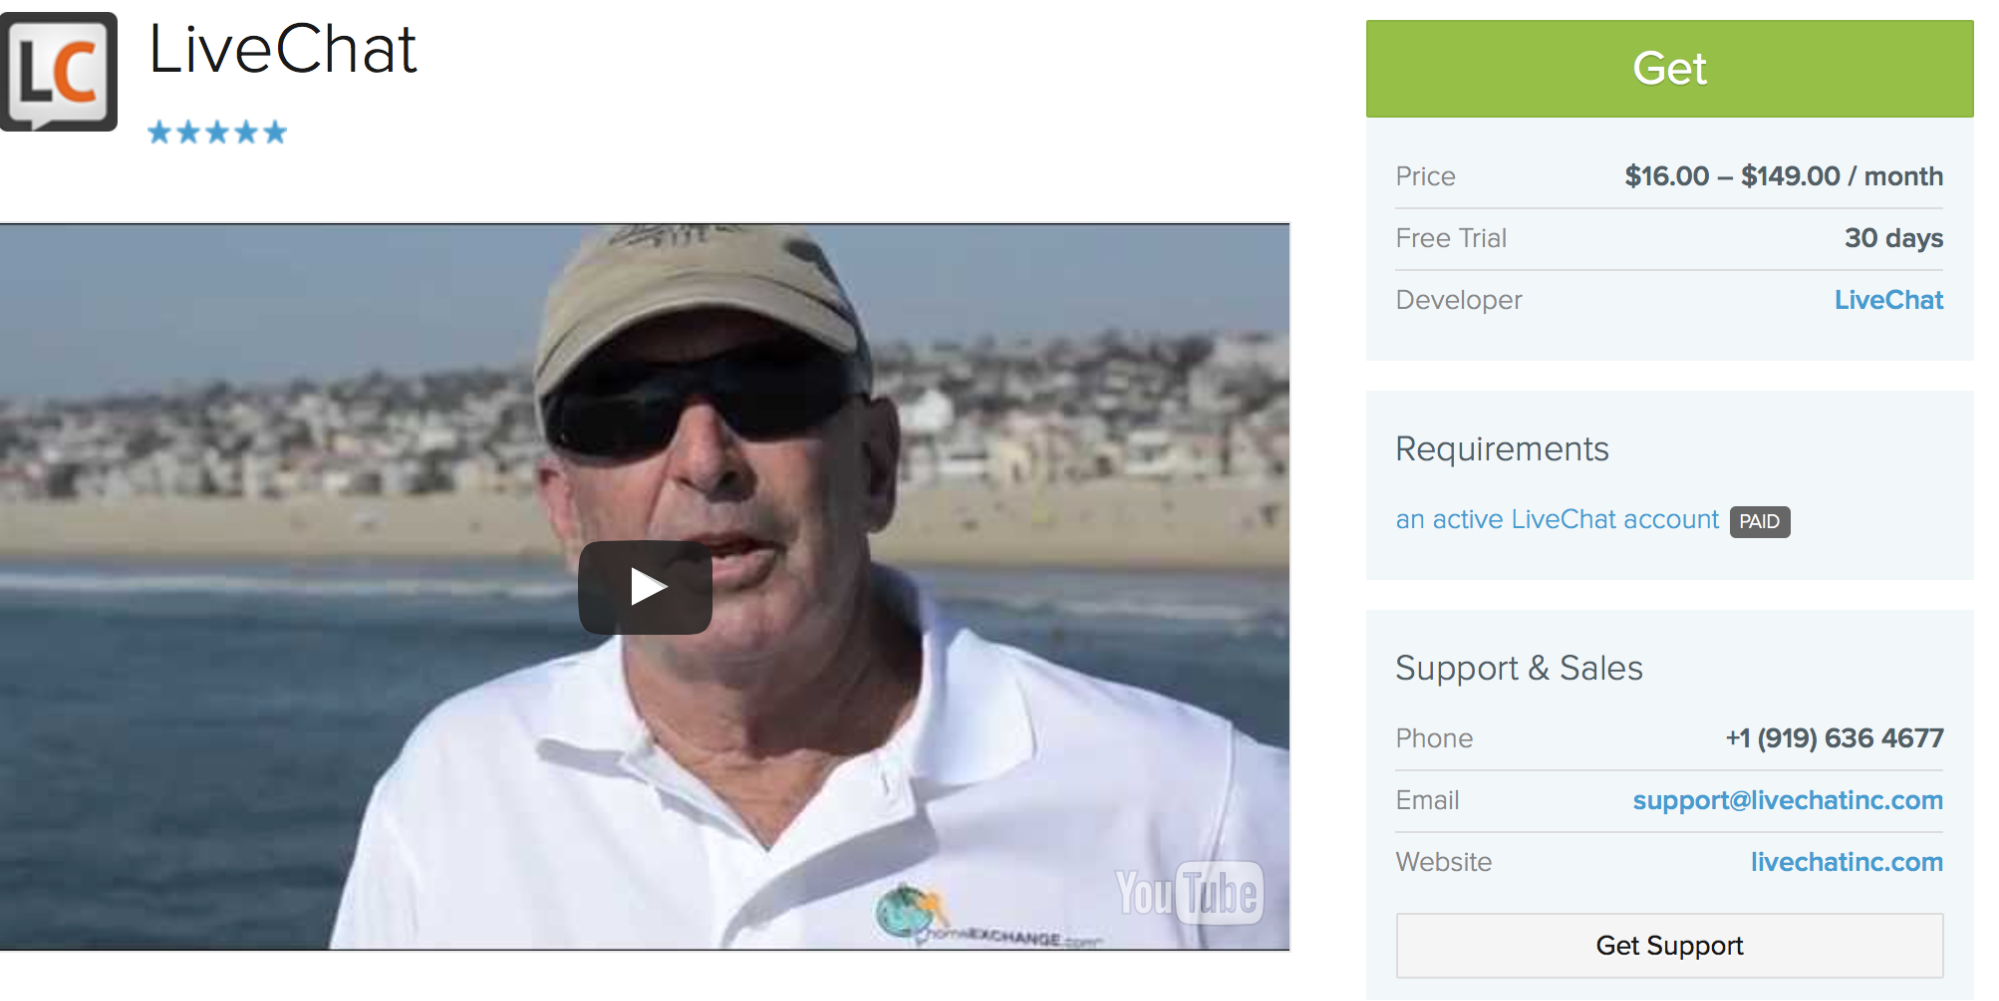
If you use Shopify, you can install the ‘Live Chat,’ app, making the installation process relatively easy.
However, even if you don’t have Shopify, you can still install it on your ecommerce site – you may just need the help of someone who has a bit of technical know how.
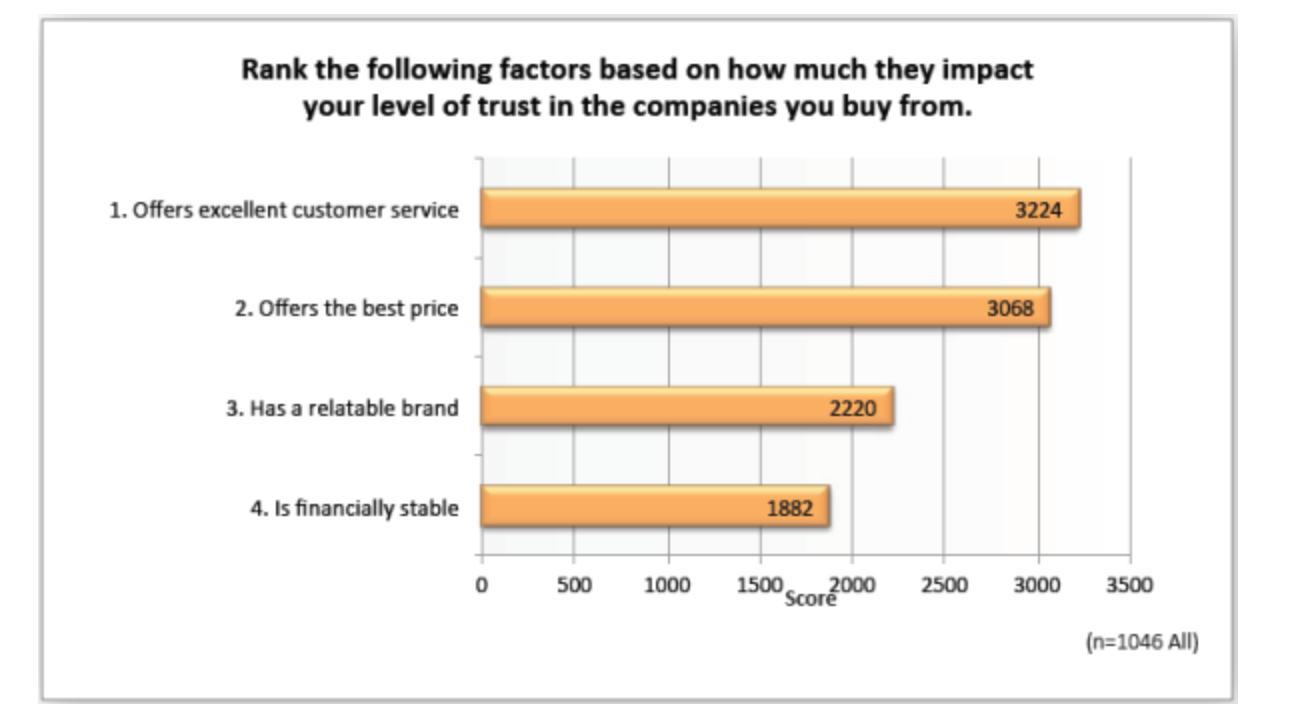
Customer service was the number one factor that influenced the amount of trust people have in the companies that they buy from.
By implanting Live Chat, you ensure that your site can provide top notch levels of customer service.
There’s also the option of using ‘trust badges’ throughout your checkout process.
Where you place trust badges will depend, as you’ll find that some websites have trust badges right at the top of website, so that they’re visible on every page.
However, it might be a better idea to place your trust badges where they are needed most – and that’s during the checkout process.
After all, 17% of those who abandon their carts, do so because of ‘concerns about payment security.’
And some surveys have even found that 61% of people do not complete their purchases, due to the lack of a trust seal.
The problem, however, is that there are dozens of trust seals to choose from.
So how do you know which one is the right one to use on your site?
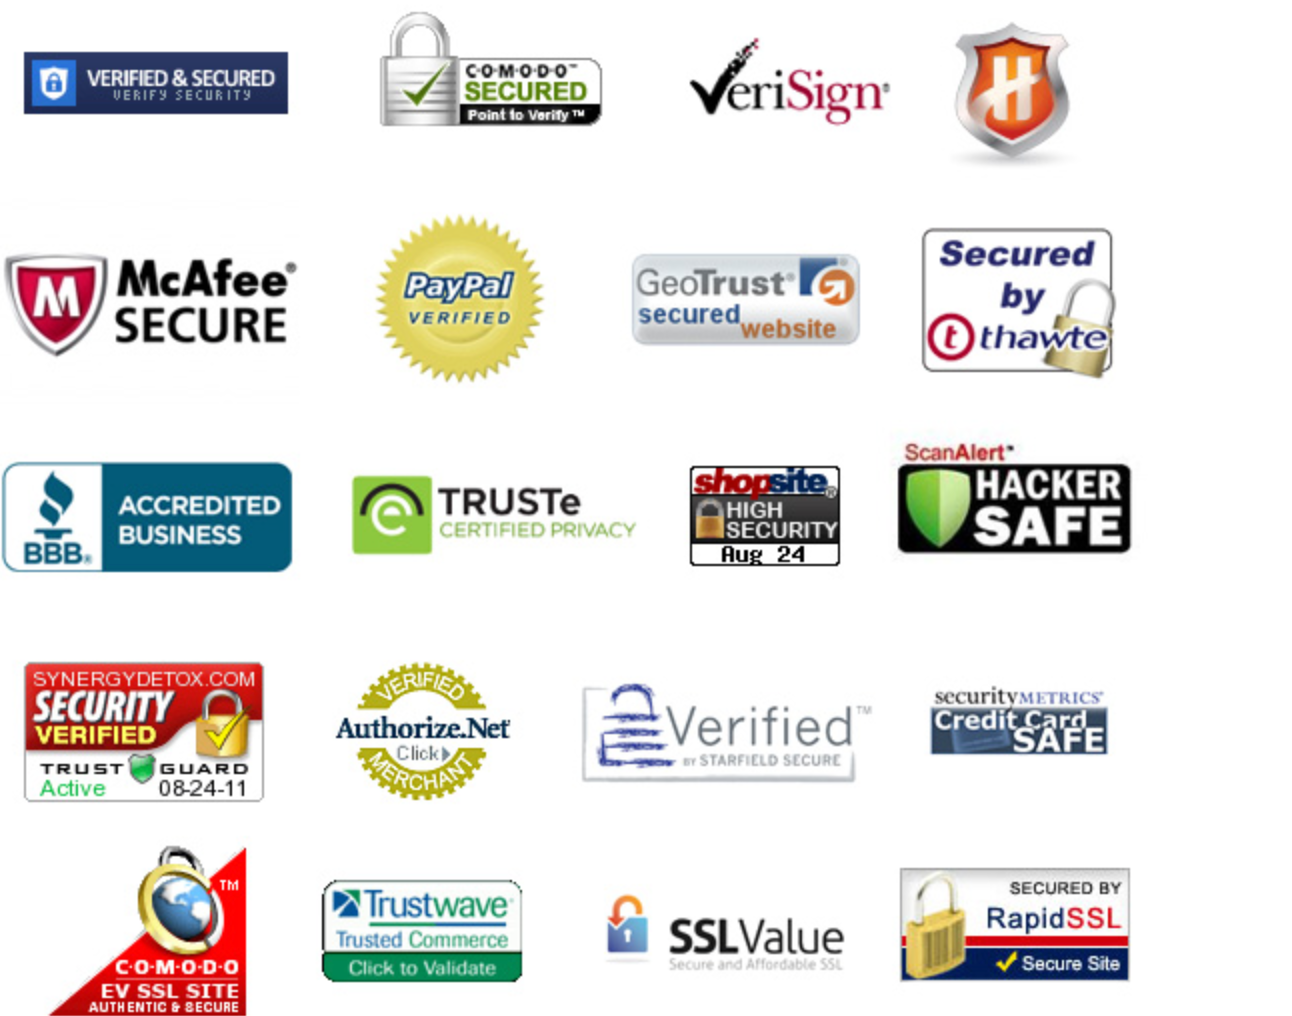
Below is a graphic, that visualizes how people react when asked ‘Which logos do you trust.’
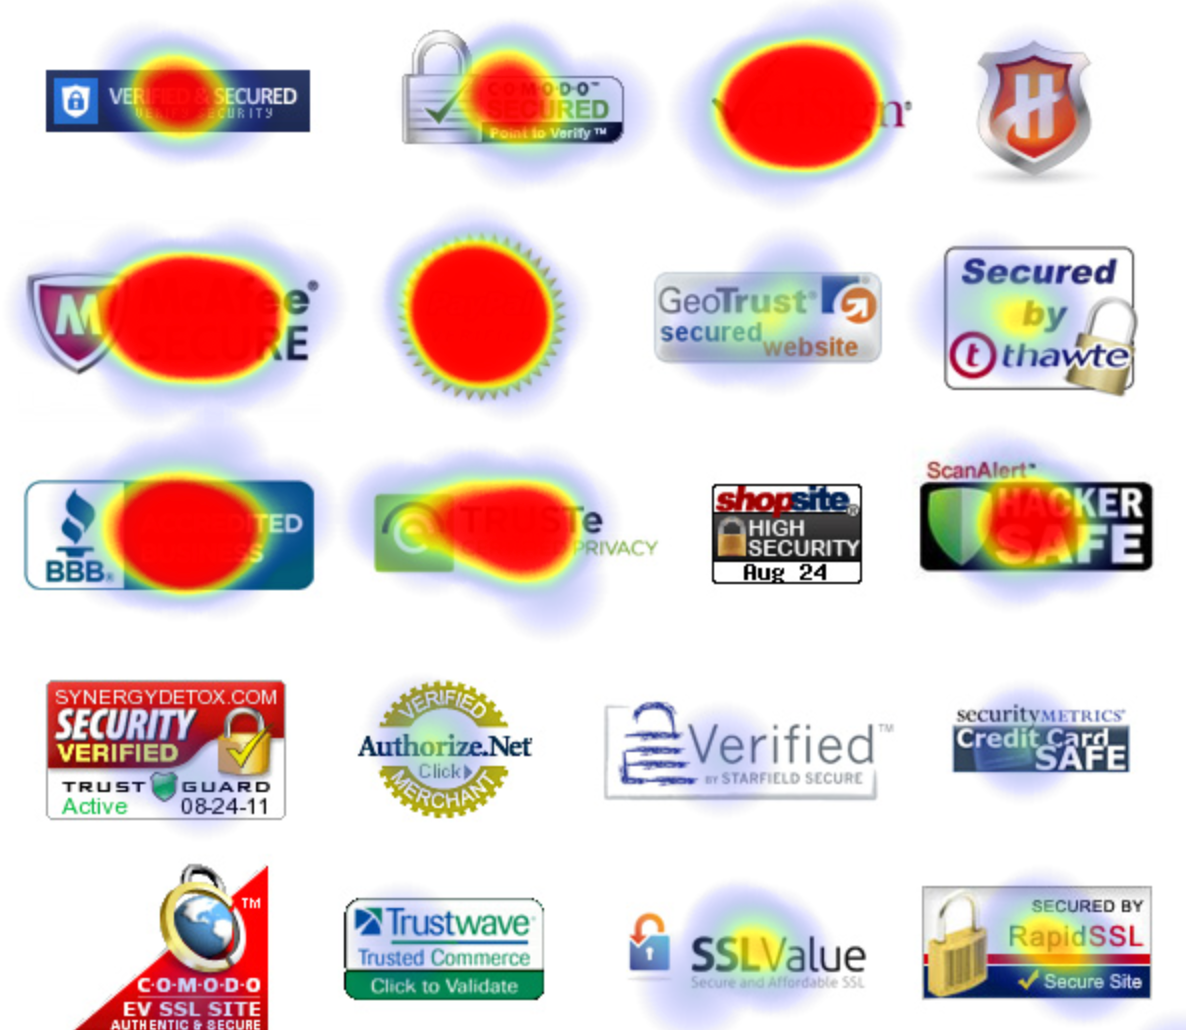
As you can see the PayPal logo performed pretty well with 66% of people trusting it.
However, Verisign isn’t too far behind with 63% of people trusting it.
The third most trusted logo was McAfee, with 62% of people trusting it.
Therefore, if you’re looking to implement some trust badges on your site, consider using those three to begin with.
You’re always free to change things around later if the logos aren’t bringing you the kind of results you’re after.
Finally, if you can, it might also be helpful to provide some testimonials on the checkout page.
Testimonials are probably one of the best forms of Social proof do not always pdf.
If you use them properly, they can provide your website visitors with the reassurance that they need before they click on the buy button.
As with the trust badges, you might want to include some testimonials on your checkout page, in order to maximize their efficacy.
The testimonials you use should deal with any last minute concerns people might have when it comes to buying a product from you.
For instance, if you had a testimonial that said:
The experience was so stress free – They happily processed my returns and even provided me with a coupon for my next purchase.
It’s clear to see how such a testimonial can boost confidence in purchasing from a certain company.
Now, of course, you don’t want to doctor any of your testimonials and they should all come from real people.
But you can tease out great testimonials by asking the right questions when collecting them.
For instance, “What did you enjoy about the buying process” “What made you feel comfortable enough to buy from us.”
Keep in mind, though, that you’re not trying to lead people into saying something here.
Always ask for permission before using a testimonial on a certain part of the site.
3. Make your Checkout process simpler
There’s also the option of making your checkout process simpler.
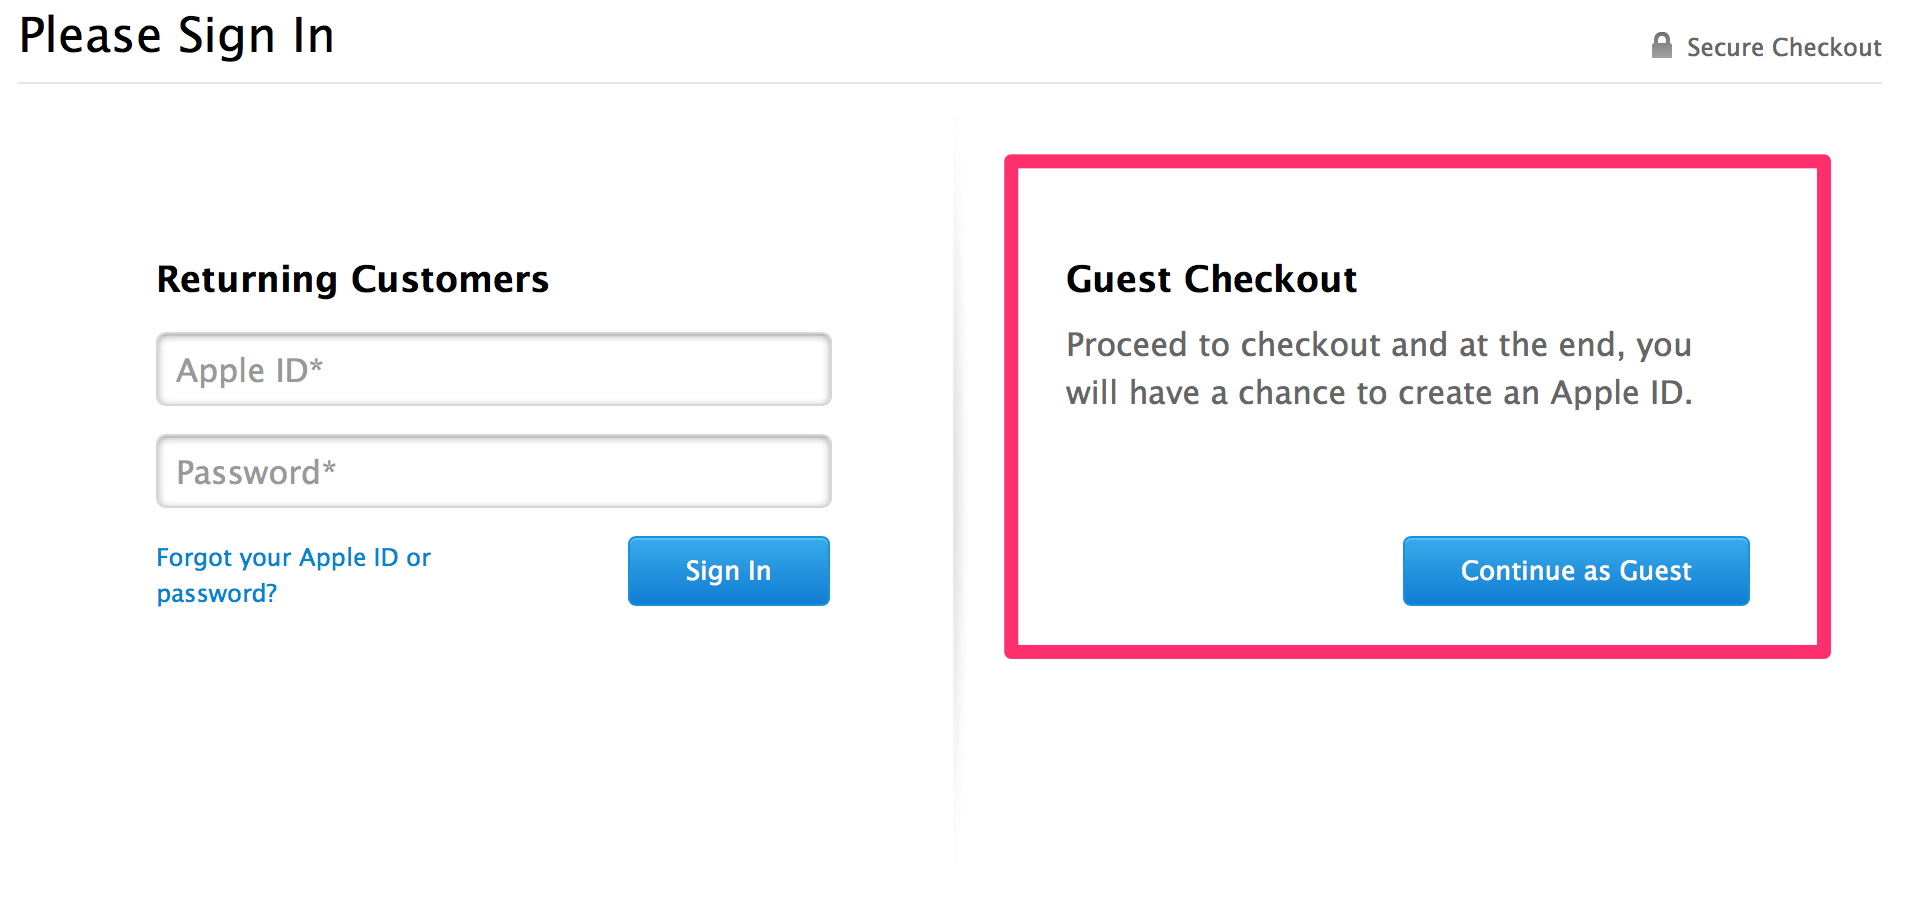
For example, you might want to consider removing the need for people to sign up.
By providing people with the option to checkout as a ‘guest,’ you’ll be able to soften the process of checking out.
Apple does a great job at this, and if you’ve ever been through their checkout process, you’ve probably experienced their ‘Guest Checkout’ option.
In fact, one company even managed to achieve a $300,000,000 rise (!) in sales by removing the need to register before an item could be purchased.
All of this helps to reduce friction and therefore makes the job of going through the checkout process easier, and less tiresome.
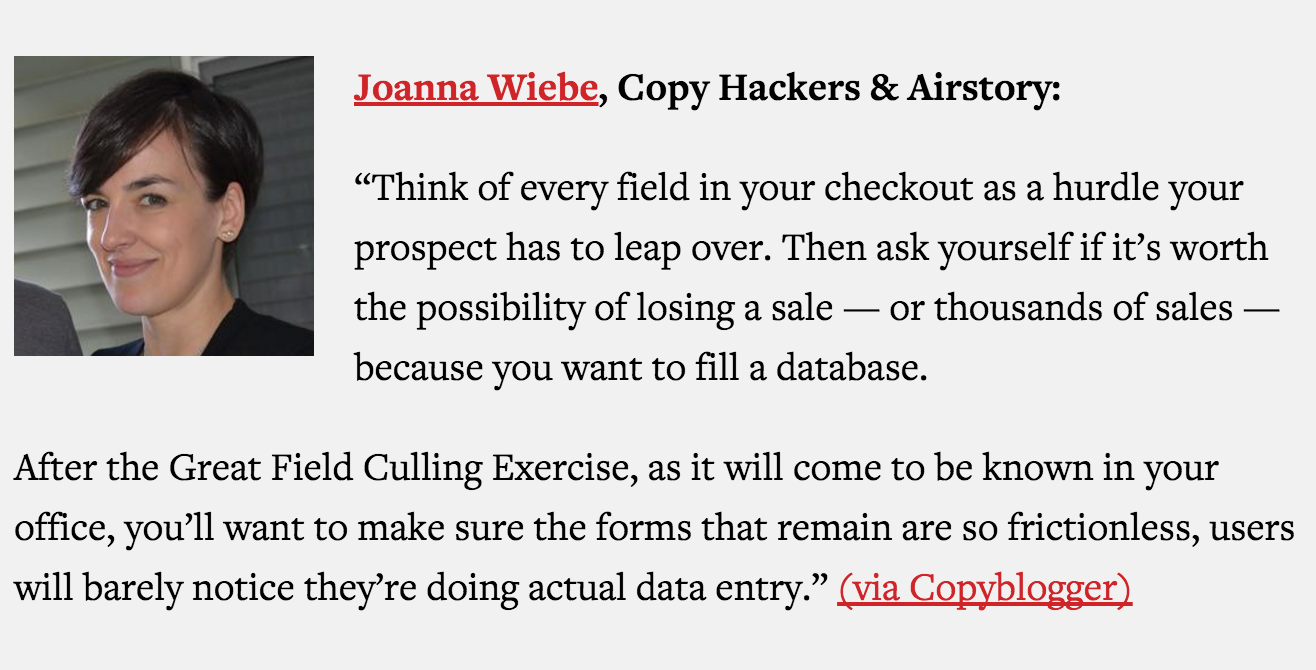
Another way you can make the checkout process simpler is by reducing the number of form fields that potential customers need to fill in.
Here’s a great explanation from Joanna Wiebe, that explains the impact of form fields on the checkout process.
You can even add features that make it so that the ‘necessary,’ form fields are easier to fill in.
For instance, if someone is filling out their delivery address, you can just provide a button that allows for people to use that same address as their billing address.
On top of that you can also make it so that all they need to do is enter in their postal code, allowing them to select their address from a drop down menu.
And as Joanna mentioned above, you might just want to eliminate some fields altogether!
Though it doesn’t count as exactly making the checkout process simpler, you’ll also want to consider including a progress bar, within your checkout page.

This just gives people a sense of progress as they’re moving through the checkout process and keeps them engaged as they now know when the process will finish.
4. Use email marketing
The other method you can use to grow your ecommerce store is email marketing.
According to some email marketing has an R.O.I of 4,300% – so it’s definitely worth spending some time on.
There are two ways to approach email marketing for your ecommerce store.
One is marketing to a list you already have and the other is creating a new list entirely.
If you already have an email list of customers, which is true for many ecommerce stores because people provide them during the checkout process, you’re off to a good start freely noises.
However, if you do not have an email list already, then you’ll need to first focus on creating your list.
You can do that by running some paid traffic to a page where you get people to opt in to your email list.
If you want to do that well, it might be a good idea to conduct a giveaway.
If you can create a really enticing giveaway comprised of the products that can be found on your site – you can ask people to enter their email address in order to ‘put their name in the hat.’
Giveaways like this tend to work really well if you run the right kind of traffic to them.
And you can do that by sticking to the principles that we discussed earlier in this post.
If your giveaway is set up properly, you’ll find that it will take on a life of its own and your site promotion won’t be entirely reliant on paid traffic.
So, that’s how you can build your email list in the first place.
But what can you do in order to generate sales from that email list?
One solution is ‘Cross selling.’
This is where you sell people products that are complementary to what they have already bought.
So if someone has bought a PC you can cross sell them a printer.
Do not confuse this with upsells.
Upsells are when you try and sell people on a higher end product.
So if they’re buying a PC with 4GB of Ram and a 128GB HD, you upsell them to a 16GB RAM and 1TB HD.
Arguably, cross selling is easier to do via email, as upselling often needs a bit of real time interaction.
We’ll look later at how you can implement upsells on your site.
In any case, consider sending out emails a week or two after someone has bought something from you to promote complementary products.
You can also use email marketing to promote your offerings connected to seasonal events.
For instance, there is a chance that you might be able to tie in the offerings provided by your store with the following dates –
- Valentines Day
- Thanksgiving
- Christmas
- Father’s Day
- Mother’s Day
There are a ton of other seasonal events you can market your products around.
In fact, depending on what your store sells, there might even be a day dedicated to the industry that you’re in!
You can also periodically run sales via your email list.
You could, for example, provide a 48-hour sale exclusively for those on your list.
When you get better at email marketing, you’ll be able to segment your lists and promote these kinds of sales towards the people that are most likely to buy from you.
5. Become better at showcasing product benefits
Another thing you can do in order to improve ecommerce store sales is to showcase the benefits of your products better.
People buy benefits, not features.
There are multiple ways you can do this.
Maybe the most obvious way is by taking better pictures of the products you’re showcasing.
Taking better pictures of your product can be a little tricky, especially if you’re not experienced in the world of photography.
Here are a few tips to keep in mind, however.
The first is to ensure that you’re taking your pictures against a good background.
In most cases, you’ll go a long way by using a white background.
Here’s a great example of how that can be done herunterladen.

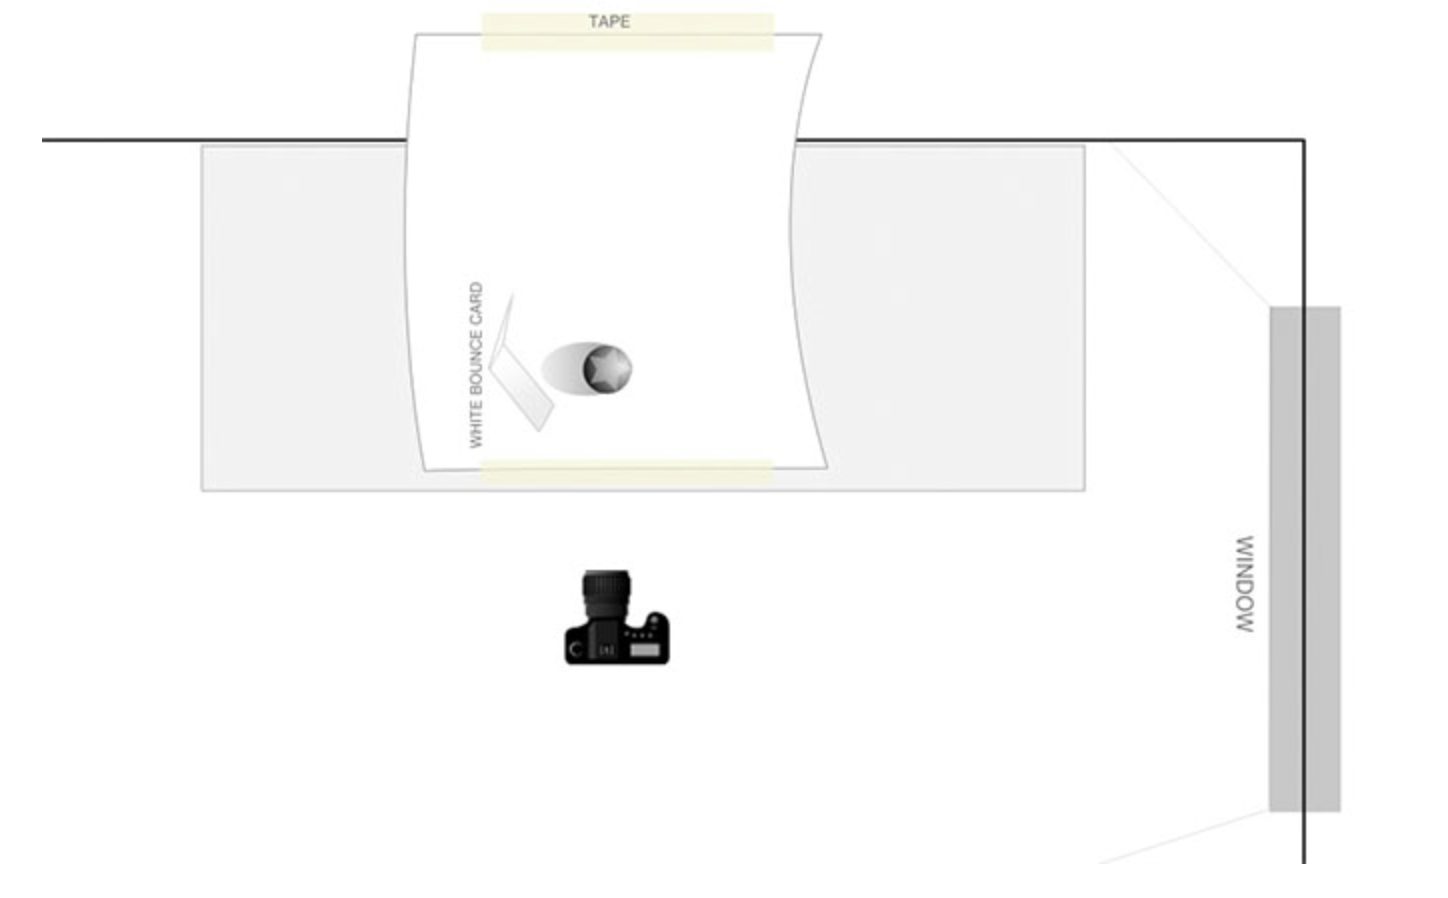
The next thing you’ll want to focus on is using the right kind of lighting.
Unfortunately, you often can’t rely on the flash provided by your camera.
In some cases, you might be able to rely on natural lighting.
Many experts recommend, however, that direct sunlight not be used as it is too harsh, so avoid using that form of light when setting things up.
Here’s a graphic from a great Shopify article that explains how you should set things up.
If you do not want to do all of the photography work on your own and you want to find an expert who can take care of all of the work for you, consider visiting Shopify Experts.
There, you can just pick from the professionals and use their expertise to ensure that your products look their best.
Keep in mind that there are multiple people there, all of whom will most likely charge different rates. So, even if you’re on a skinny budget, you should still be able to find someone.
You can also use videos to showcase your products.
Even though creating videos for your product does not need to be complicated, it can still at times be difficult to create something that looks polished and professional.
So you might again want to consider asking someone from the Shopify Experts page.
The kind of video you create is going to depend on the product in question.
But you’ll find that videos that showcase product dimensions, as well as product functionality tend to be really helpful.
And of course, the other thing you can do is to improve your product descriptions.
If you’re not used to being a ‘copywriter,’ then this may be a tough road for you.
What you want to do is to ensure that anything you’re writing is clear and benefit rich.
It is important that you write your product descriptions in a clear manner, so that they can be quickly scanned by the person who is reading the page.
Whenever you’re describing benefits, you need to have an in depth understanding of who your customers are.
You can then relate how certain features of the product will aid the struggles of your customers.
If you want to emphasize any of the points you’re making on the page, consider using some ‘Power Words.’
Here’s a great example of a product description, that comes from the Kindle product page.
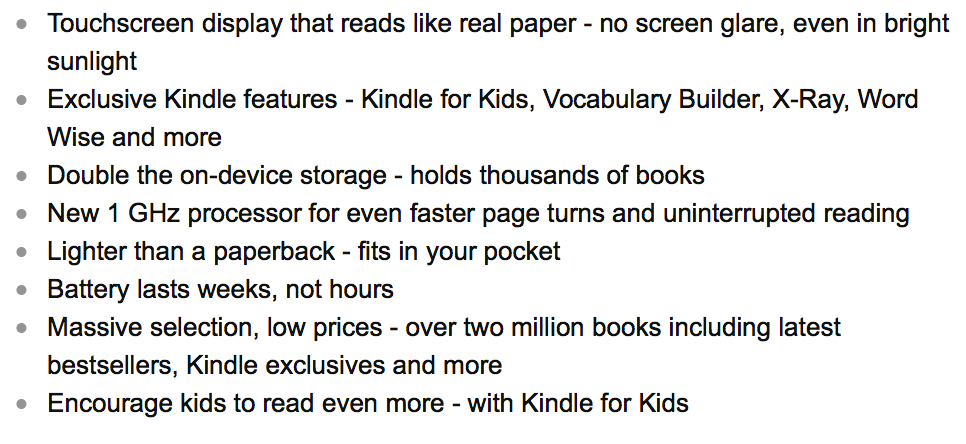
Notice how it sticks to benefits and doesn’t really mention any technical features of the product.
For example, it tells you that the kindle is lighter than a paperback – not that it’s 191 grams.
In fact, here’s the above information, but showcased in the form of technical specifications.
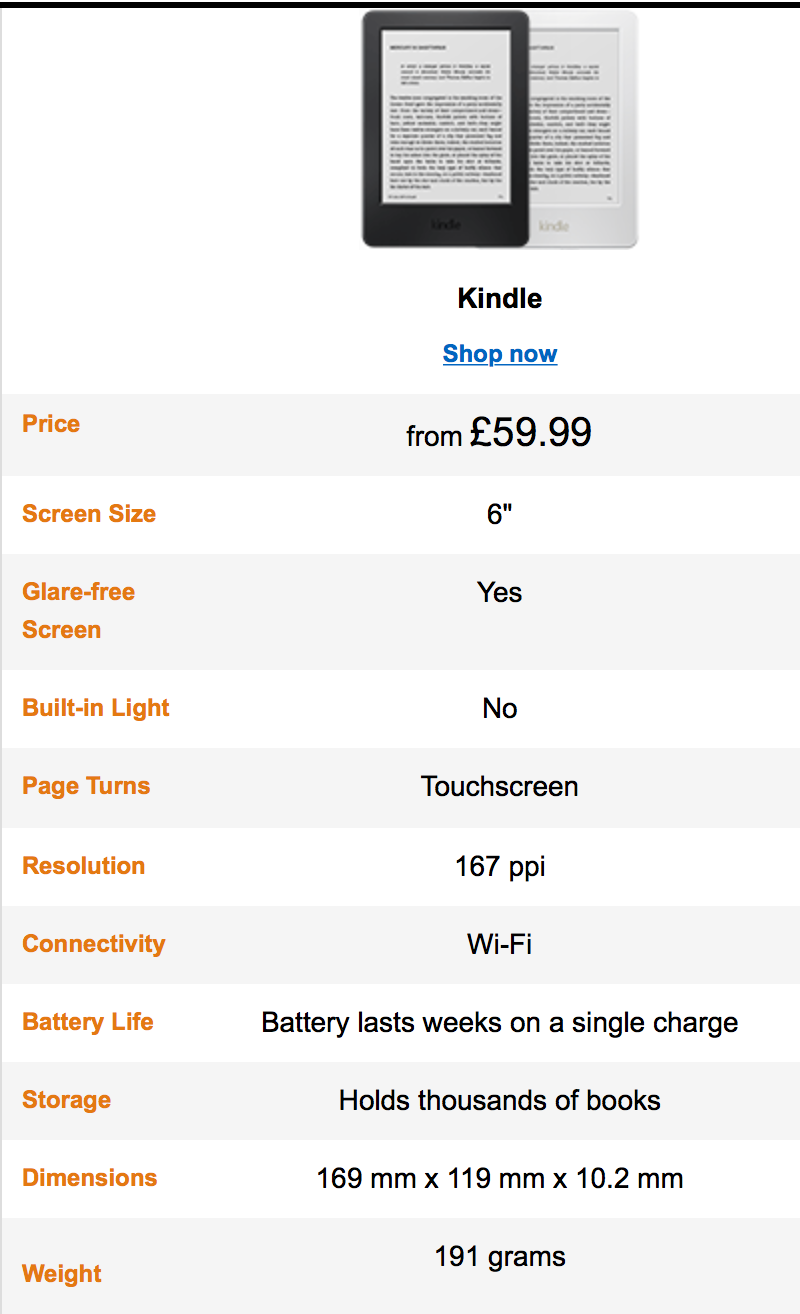
You tell me – Which one is more appealing?
Unless you’re sure that your target buyers love tech specs, the first image is much more enticing.
6. Implement upsells
Finally, you can implement the power of upsells.
To be honest, this isn’t really going to increase ‘Sales,’ but it will increase average order value.
That’s because you’re going to be taking those customers who are buying standard or basic products and leading them to buy ‘upgraded,’ or ‘customized’ versions of the products msp jetzt herunterladen.
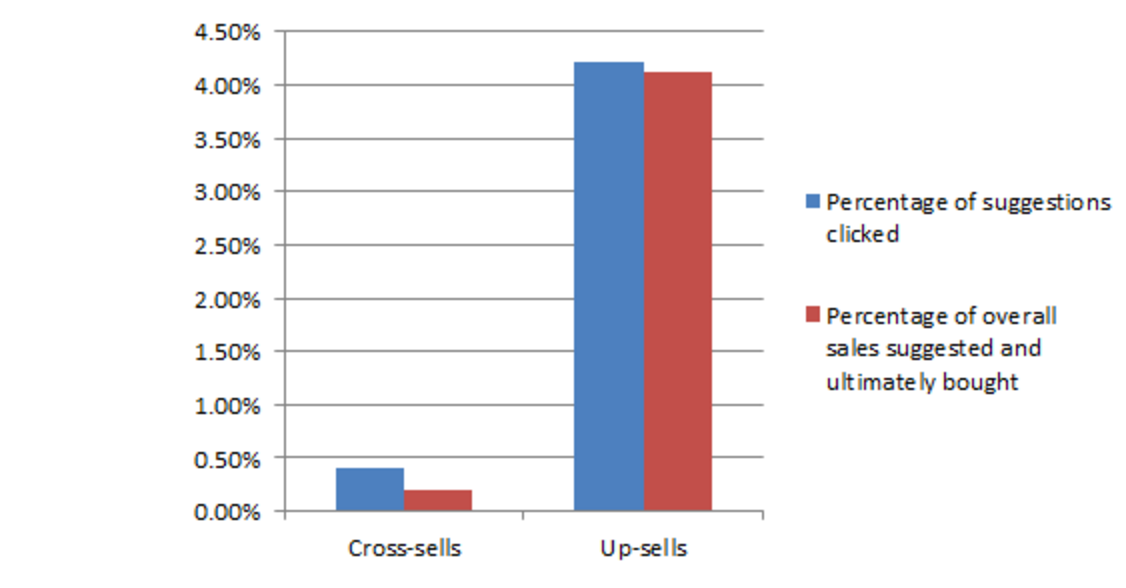
In fact a study by ‘Predicitive Intent,’ found that upsells are worth 20 times more than cross sells.
If you want to experience some upselling of your own, consider going through the Apple Checkout process.

You’ll notice that as you go through the process of buying a computer from them, you’re provided with the option to upgrade by selecting a different processor.
You’re also provided with option to choose some other upgrades.
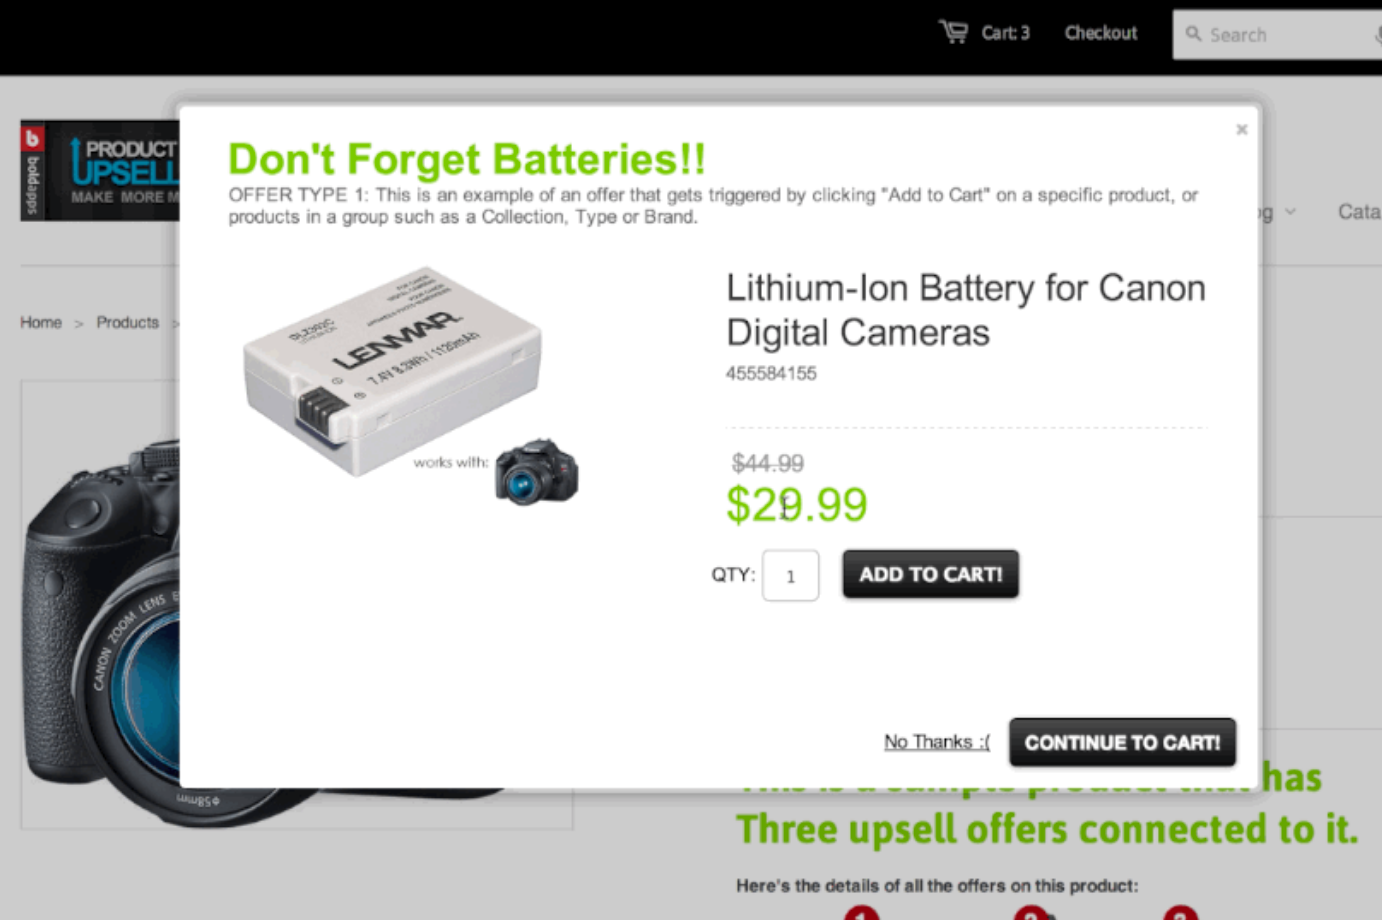
If you have a Shopify store you can use an app like Product Upsell to get the job done.
Note: the image shows a cross sell, but the tool can still be used to implement upsells.
Implementing an upsell feature on your website might appear a little bit technical, so you may want to ask for need help from someone who knows how to deal with code.
You can find such a person on Upwork.
Getting the help of such an individual might cost you a little bit more upfront, but there’s no doubt that if implemented properly, the investment will pay off.
I can’t really tell you what to upsell, as I don’t know your business and the products and services that you provide.
However, there are still some principles that you can stick to when upselling.
If you’re selling a product, then upselling simply comes down to showcasing the ‘next model up.’
Sometimes just displaying this as an option will encourage people to take action towards buying the more expensive option.
And, it doesn’t hurt to provide some information that will entice people into checking out the more expensive option.
Such information might include the ratings and reviews of the more expensive product. It might also include a feature comparison.
You might even provide a discount for anyone who decides to choose the more expensive option over the cheaper one.
Here’s a great screenshot from ConversionXL, which shows how WinZip does that.
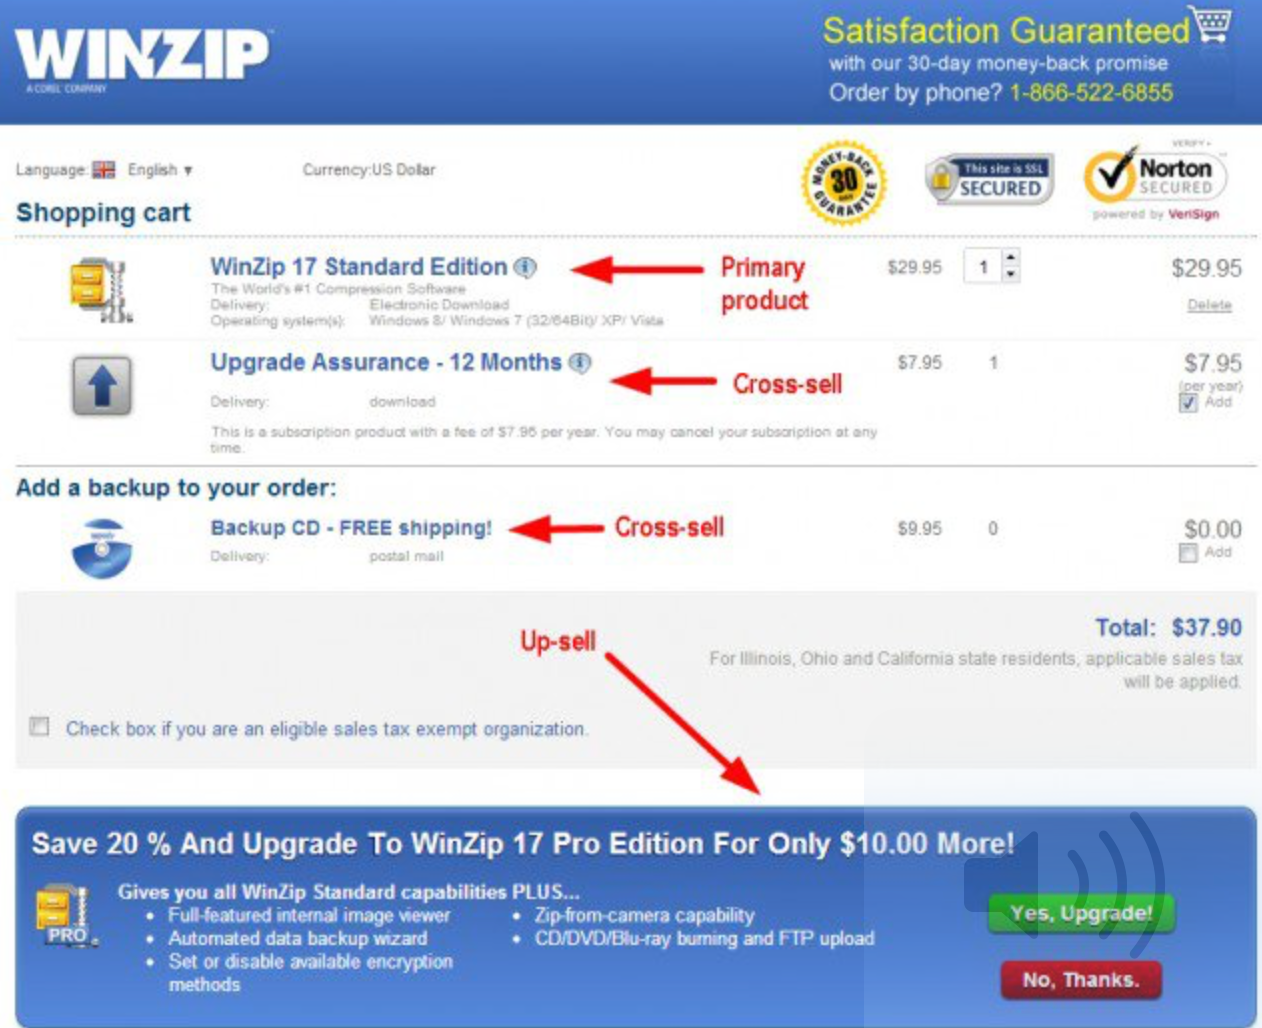
A quick note on Cross Sells.
We briefly covered earlier how you can use cross sells when doing some email marketing.
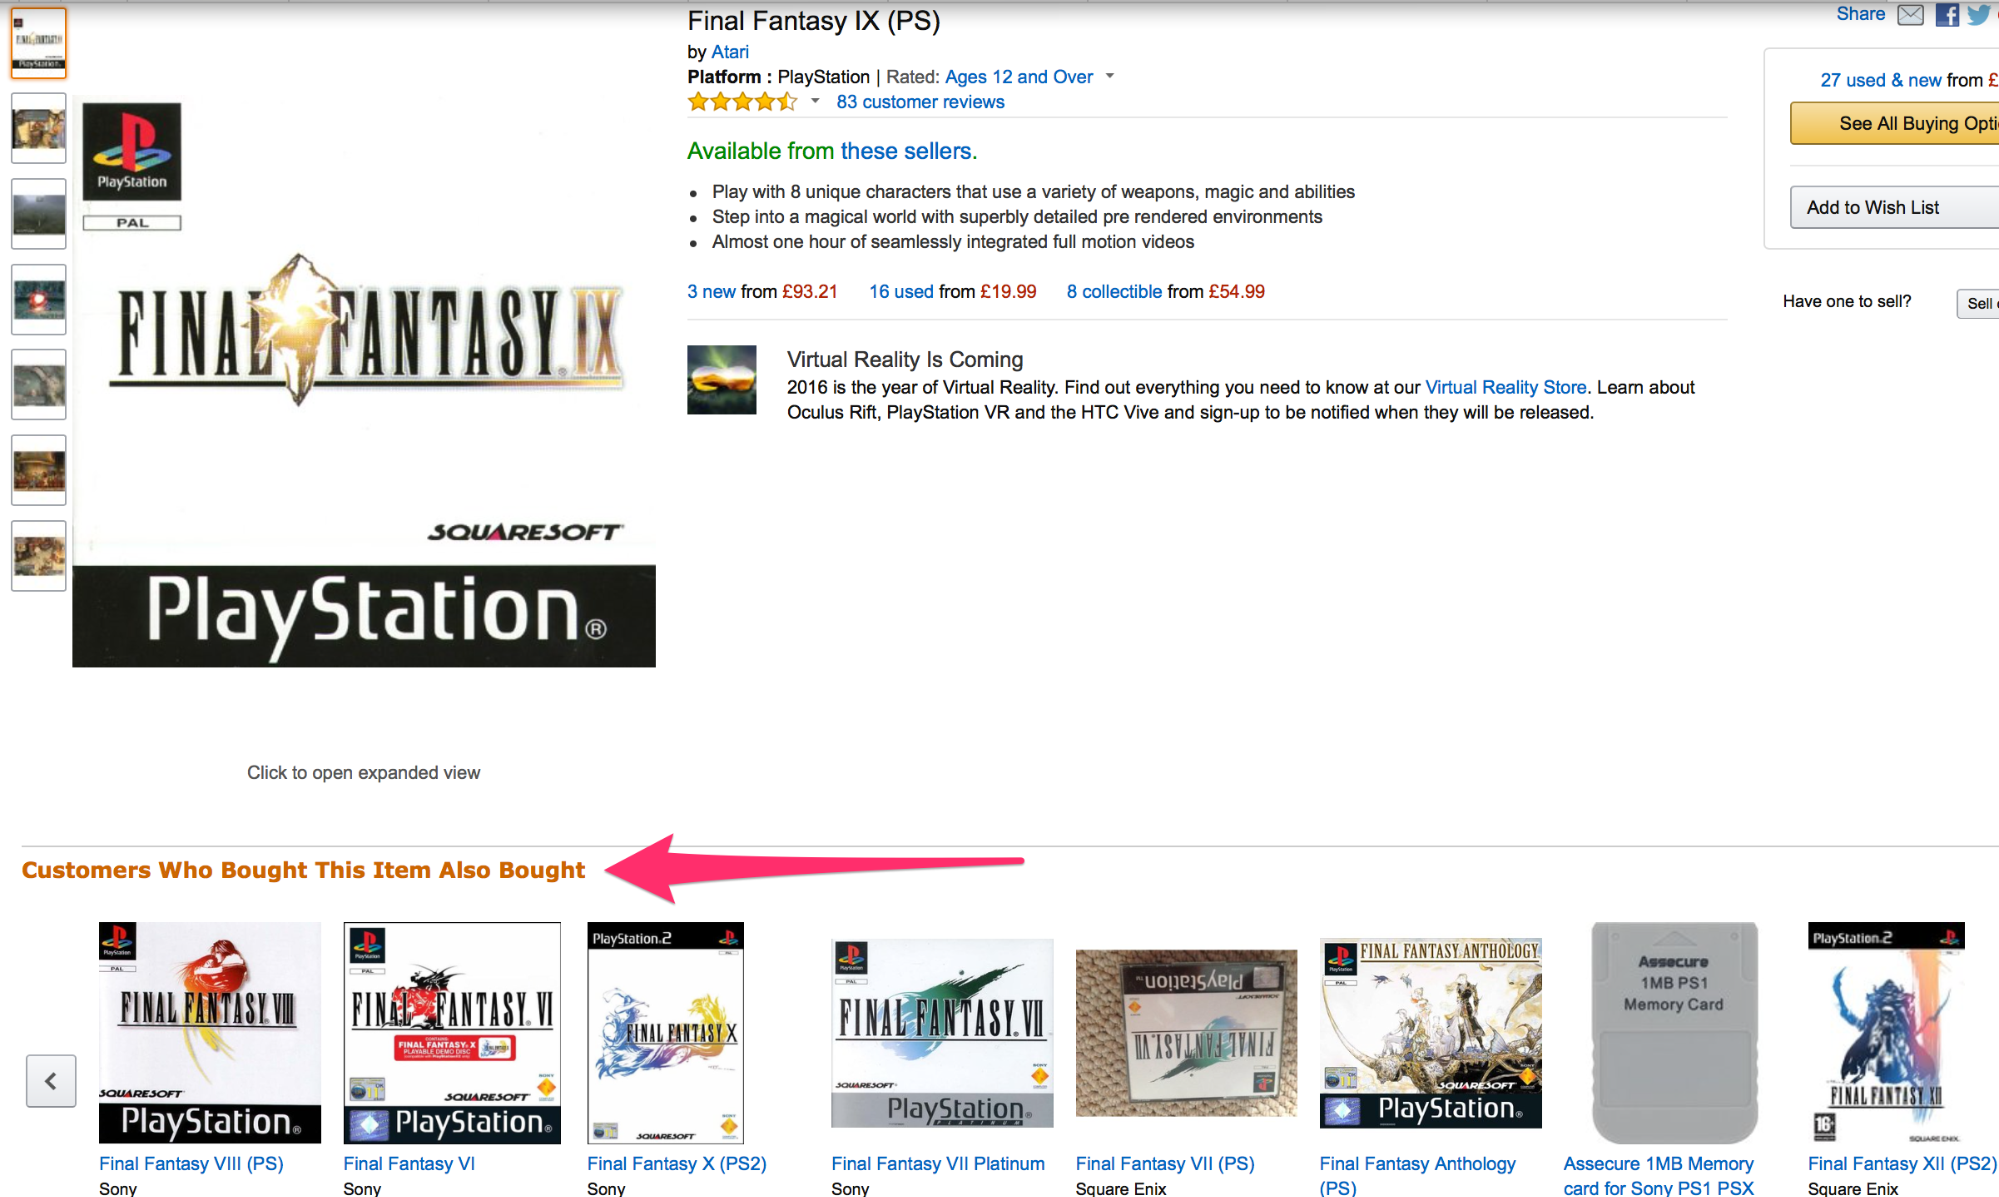
However, you can also use cross sells within your ecommerce site.
Here’s an example of how that can be done.
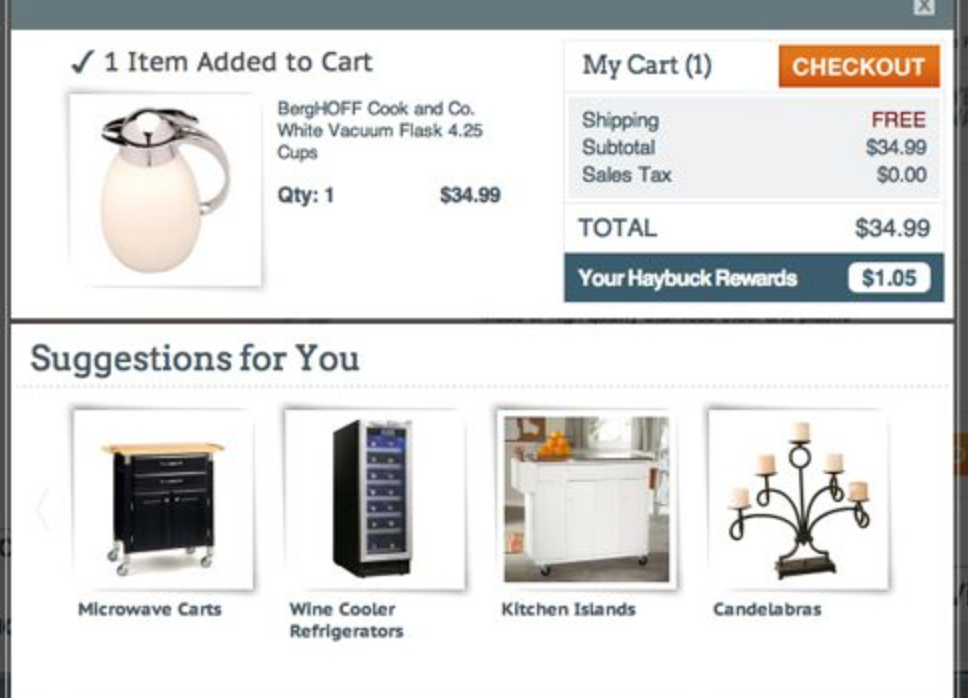
Amazon also does this quite a bit with their ‘Customers also bought,’ section.
In fact in 2006, Amazon stated that Cross Sells and Upsells resulted in 35% of their revenue.
Cross selling can help increase sales of items as well as revenue – but it might not always be as profitable as having a good upsell strategy in place.
But there’s no reason you can’t implement both.
After all, upsells and cross sells contributed to Toyshades achieving a 16% higher ‘Average Order Value.’
The strategies listed above can work – but you’ll want to take some time to define how you’re going to encourage buyers to add more items (or more expensive items) to their basket.
If you want to make the most out of upsells and cross sells, you may even need to introduce some new offerings that can be sold for a higher price route planner download for free.
Conclusion
If you are the proud owner of an ecommerce store or plan to be one in the near future, you’re probably on the lookout for tactics that will help you boost sales.
Hopefully, as a result of reading this article, you now have a sense as to what steps you can do to achieve just that.
Whether you take advantage of paid traffic offerings or you decide to implement email marketing – the options are many.
Whatever option you do decide on, its success will often be reliant on you knowing your customer well.
For instance, you can’t run a paid traffic campaign, if you don’t know who your end customer is.
In any case, now that you’re aware of what needs to be done, all that’s left is for you to do is get started and watch the tips mentioned, work for your ecommerce store.
What tactics have worked for you when it comes to boosting ecommerce store sales?


It’s really good article.
Nick, Thank you.